I am fully into planning and now sewing up my spring/summer capsule wardrobe. Navy is my dark neutral of choice for summer because it feels more summery than my beloved black and charcoal grays. As part of my minimalist, mix and match, capsuling efforts I try to limit myself to 2 or 3 dresses. I feel like I get more use out of separates, but I do love dresses, especially for Sundays.
I treated myself to a new pattern - the Grainline Studios Lark Tee. It's been out for a couple of years I think, but I'm slow to new things I guess. I made myself a boatneck, 3/4 length sleeve tee to try it out. I really liked it so I hacked it into a dress for this navy and white striped Girl Charlee Bolt fabric. And then, the very NEXT day, Grainline released an expansion pack for more top/dress options and cardigans. I'm extremely likely to buy the dress pack anyway just for the turtleneck and cowl neck options.
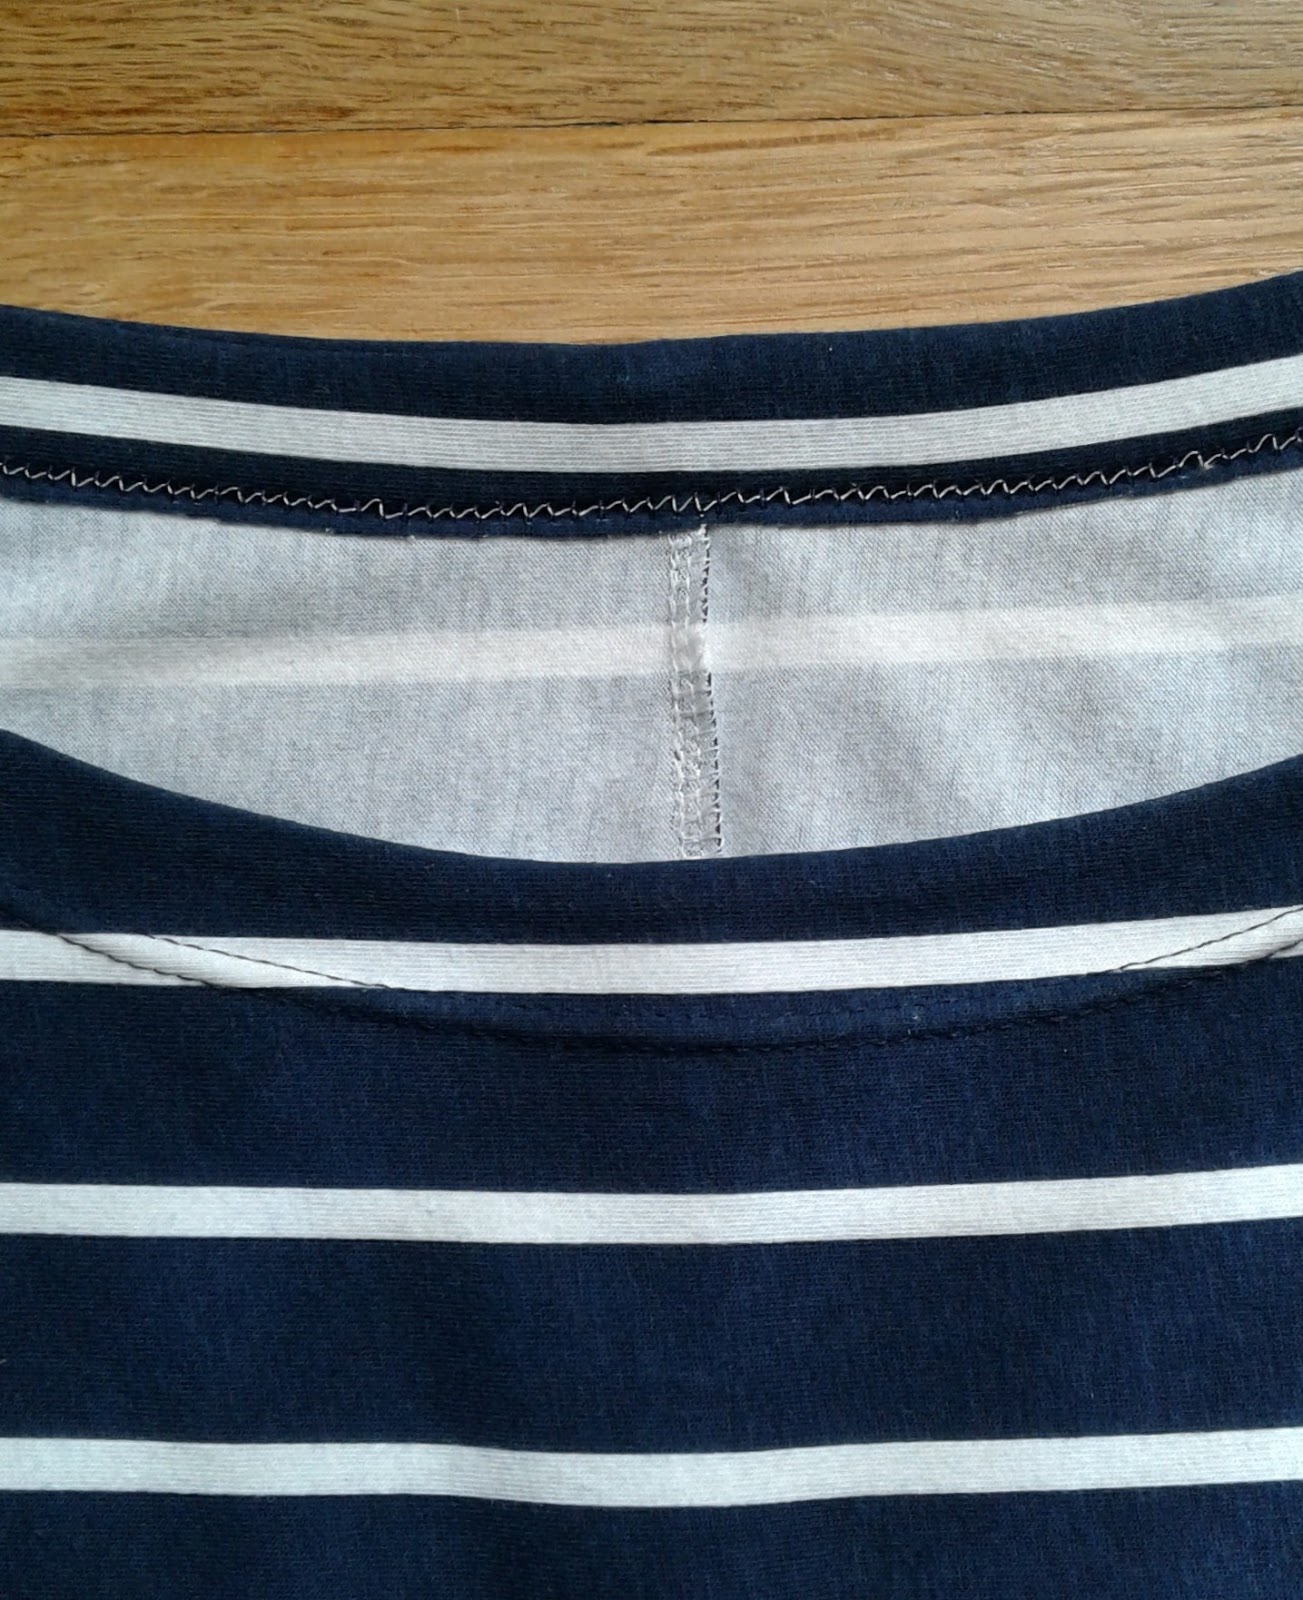
I changed up a couple of things to make my dress. First off, I cut the back as 2 pieces adding seam allowance. This allowed me to shape the back more and add a little definition. It also meant more stripe matching, but it was worth it. My best tricks for stripe matching are to use way more pins than normal, baste first, and try your walking foot if it's just not feeding right.
I spent my 20's focused on work/career. In my 30's I connected with my spirit. Now, in my 40's, I am obsessed with sewing!
Showing posts with label womens. Show all posts
Monday, April 24, 2017
Thursday, March 2, 2017
A Girlier Lane Raglan
If you look at this picture...
...you might think I made a Lane Raglan. No big deal. Right? We've all made a bazillion Lanes by now. But there are a few things I want to show you about this particular Lane Raglan.
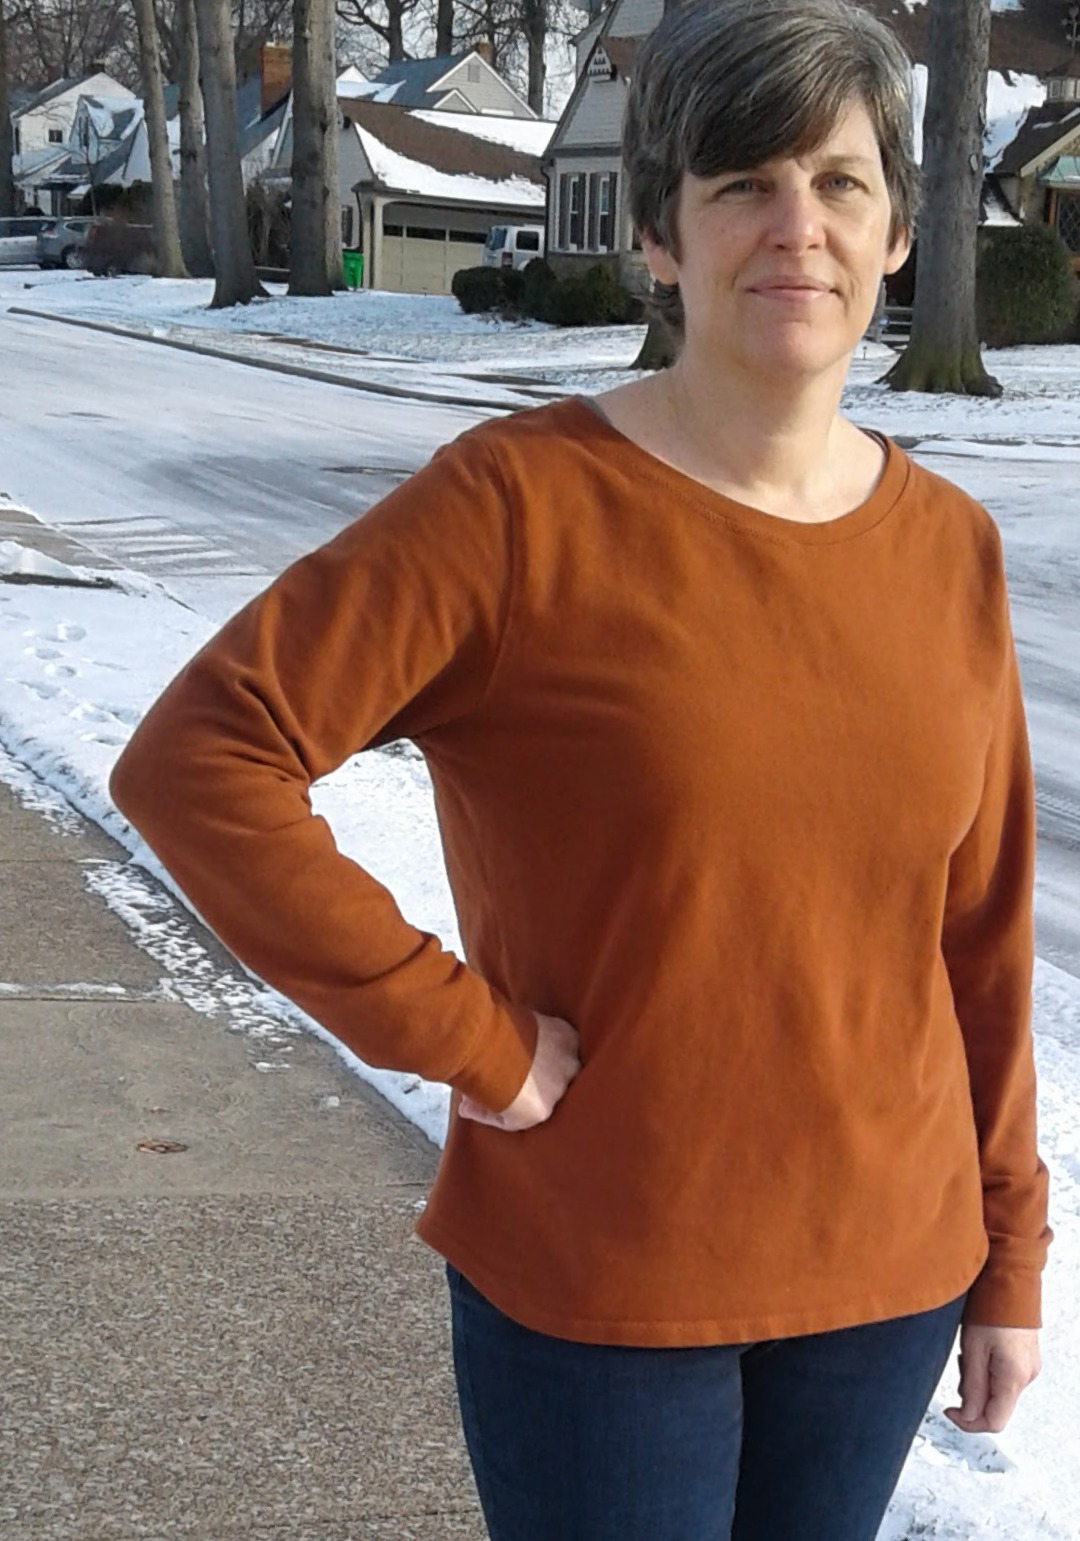
The first is the that I followed some advice I'd never heard before and cut my neckband on the bias. This comes from Melissa at Melly Sews and I think it turned out great. This fabric doesn't have a ton of stretch so I think it was key in getting a nice flat neckband. Check out her post here.
The second thing is the change to the sleeve.
I copied the proportions of a knit top I bought at Kohl's this winter. I cut the sleeves at 6 inches and added 6 inch bells or ruffles or whatever you want to call them, for 3/4 length sleeves overall. There is only 4" of extra width gathered in so they aren't too full.
The third thing is the stitching.
I'm still on the decorative stitching instead of double needle stitching kick. It's just so easy and adds a nice touch. This is stitch #40 on my Singer Quantum Stylus. You know how long that would take me by hand? I do enjoy hand embroidery, but this is so much quicker. Just be sure you have enough thread on both your top thread and bobbin before you start each area because running out in the middle of a line is not attractive. I used this to hem the sleeves and bottom as well and also to topstitch the neckband down.
The last thing I want to talk about is the fit. It's a bit tight in the chest. I'm sure you noticed but were too nice to say anything. So here's my excuse. This top fought me every step of the way. I started out using a completely different pattern for a draped front raglan that I've made in the past. BUT, I just didn't like how it looked in this fabric AND I accidentally attached the front piece inside out! I had serged and lightening bolt stitched so there was no chance of unpicking the whole thing. So I cut it apart and was able to re-cut the front and back pieces and cut entirely new sleeves using the Lane pattern, but the sleeves had to be shorter and I had to use the tiniest seam allowances possible.
So it is a bit snug, but I'm not worried because I gave up dairy for Lent and should be able to drop my winter weight pretty quickly while I suffer through Mexican food sans cheese and no homemade yogurt with homemade granola for breakfast, etc. My chest is one of the first places I lose weight, so that's kind of good news for this top.
What I really like about this top is that it's basically a t-shirt and suits my casual everyday style, but I feel like it can be dressed up a bit too. The fabric is a wool jersey that was nice to work with and feels good - not like wool in other words.
This top makes me feel ready for spring, but I really need some new jeans and pants in general. I think I'll wait and see how much the lower half of me loses though before I shop or sew much more for me.
The first is the that I followed some advice I'd never heard before and cut my neckband on the bias. This comes from Melissa at Melly Sews and I think it turned out great. This fabric doesn't have a ton of stretch so I think it was key in getting a nice flat neckband. Check out her post here.
The second thing is the change to the sleeve.
I copied the proportions of a knit top I bought at Kohl's this winter. I cut the sleeves at 6 inches and added 6 inch bells or ruffles or whatever you want to call them, for 3/4 length sleeves overall. There is only 4" of extra width gathered in so they aren't too full.
The third thing is the stitching.
I'm still on the decorative stitching instead of double needle stitching kick. It's just so easy and adds a nice touch. This is stitch #40 on my Singer Quantum Stylus. You know how long that would take me by hand? I do enjoy hand embroidery, but this is so much quicker. Just be sure you have enough thread on both your top thread and bobbin before you start each area because running out in the middle of a line is not attractive. I used this to hem the sleeves and bottom as well and also to topstitch the neckband down.
The last thing I want to talk about is the fit. It's a bit tight in the chest. I'm sure you noticed but were too nice to say anything. So here's my excuse. This top fought me every step of the way. I started out using a completely different pattern for a draped front raglan that I've made in the past. BUT, I just didn't like how it looked in this fabric AND I accidentally attached the front piece inside out! I had serged and lightening bolt stitched so there was no chance of unpicking the whole thing. So I cut it apart and was able to re-cut the front and back pieces and cut entirely new sleeves using the Lane pattern, but the sleeves had to be shorter and I had to use the tiniest seam allowances possible.
So it is a bit snug, but I'm not worried because I gave up dairy for Lent and should be able to drop my winter weight pretty quickly while I suffer through Mexican food sans cheese and no homemade yogurt with homemade granola for breakfast, etc. My chest is one of the first places I lose weight, so that's kind of good news for this top.
What I really like about this top is that it's basically a t-shirt and suits my casual everyday style, but I feel like it can be dressed up a bit too. The fabric is a wool jersey that was nice to work with and feels good - not like wool in other words.
This top makes me feel ready for spring, but I really need some new jeans and pants in general. I think I'll wait and see how much the lower half of me loses though before I shop or sew much more for me.
Tuesday, February 21, 2017
Skip the Double Needle Hem
I made myself this sweatshirt back in November and it took me until now to get some pictures of myself in it. I wear this about once a week because it is so warm and comfy. The fabric is organic french terry from Cali Fabrics last year. They still have it in forest green if you are interested in using great organic fabric that feels good and you can feel good about using.
The pattern used here is the Sofilantjes Otium Sweater again. The only change I made was to round the bottom up at the sides a little. This is the most basic version of the pattern and I realize it's not exactly exciting, so why I am blogging this you may be wondering.
It took me a couple of years to get smart and read my sewing machine manual to learn to properly use my double needle for hemming and topstitching. Now I'm a pro at it, but I still find it annoying. I have to wind an extra bobbin and change the needle. Not that that is so awful, but there is another way. A lot of the decorative stitches on my machine are stretch stitches too. A quick snap on of a different foot and you can be in business. For this sweatshirt, I used matching thread to add subtle details at the seams and the bottom hem. It's such a quick and easy way to add a small detail to a basic without needing another machine. I was thinking of using this technique with that fun rainbow variegated thread for a top for Elena. I think she'd like that.
The snow has melted, spring is not far off. I'm really getting excited about spring/summer sewing ideas so I hope to be back soon with something fun to show you.
Thursday, January 5, 2017
Wool Jersey Otium Sweater Hack
Happy New Year! It's been a busy couple of months since I've posted, but let's just pick up where we left off. It'll feel like reconnecting with your old college friend you haven't talked to in ages. You don't need to hear what's been keeping me away, let's just be happy to be back together.
I treated myself to a few cuts of wool knits from the Imagine Gnats shop. My first make of this year is a Sofilantjes Otium Sweater hack using this wool jersey. This is my first time purchasing and using wool jersey, but it won't be my last! I think it has surprised me in a couple of ways. First off, it's soft. I was worried about buying online without feeling it, but I read a review that said it was soft, and it is. No scratchiness at all. The second surprise was that it was completely easy to sew with requiring no special anything.
The only pictures I have are selfies in the mirror. Several technological difficulties have happened around here lately and it's been pretty tough to keep up with all the changes. As it is, my laptop is hooked up to a 32" TV right now for me to even post this. I was pretty pleased with myself for figuring out that I could unhook teen boy's Xbox and plug that cord into my laptop to use the TV as a monitor. Yay me.
If you aren't familiar with the Otium Sweater pattern, I'll tell you it's a great basic that has some options to dress it up. I have the bundle pack so I've made several for all the women in the house. I did make a couple small changes of my own to this one. For starters, I cut the bodice pieces 3" shorter, but then cut a large 10" band to double up for the bottom. I did this as a design detail but also to add weight to the top so it would hang nicely.
Being familiar with the pattern, I knew that the sleeve length is nice and generous already requiring no additional length for me whereas I often have to add length to other designers patterns. I wanted a long, slouchy sleeve look though, so I cut the cuffs double the usual length. I also narrowed them some to fit my bony wrists snugly. Love how they turned out.
The pattern calls for finishing the neck with a band, but I simply turned and topstitched with my double needle and matching thread. The front is possibly a bit higher also. I cut it much higher but then cut some back off so I can't really say how much different it is from the pattern.
So that's it. Today, our outdoor temp is 21 degrees. We keep our house at no more than 68 during the day. I'm wearing a silky (poly I guess, though I wish it was silk) cami underneath and am completely warm and comfortable. The first make of 2017 is a success. I have the next wool top cut out in this fabric and ready to sew so hopefully I'll be back next week with that one.
I treated myself to a few cuts of wool knits from the Imagine Gnats shop. My first make of this year is a Sofilantjes Otium Sweater hack using this wool jersey. This is my first time purchasing and using wool jersey, but it won't be my last! I think it has surprised me in a couple of ways. First off, it's soft. I was worried about buying online without feeling it, but I read a review that said it was soft, and it is. No scratchiness at all. The second surprise was that it was completely easy to sew with requiring no special anything.
The only pictures I have are selfies in the mirror. Several technological difficulties have happened around here lately and it's been pretty tough to keep up with all the changes. As it is, my laptop is hooked up to a 32" TV right now for me to even post this. I was pretty pleased with myself for figuring out that I could unhook teen boy's Xbox and plug that cord into my laptop to use the TV as a monitor. Yay me.
Being familiar with the pattern, I knew that the sleeve length is nice and generous already requiring no additional length for me whereas I often have to add length to other designers patterns. I wanted a long, slouchy sleeve look though, so I cut the cuffs double the usual length. I also narrowed them some to fit my bony wrists snugly. Love how they turned out.
The pattern calls for finishing the neck with a band, but I simply turned and topstitched with my double needle and matching thread. The front is possibly a bit higher also. I cut it much higher but then cut some back off so I can't really say how much different it is from the pattern.
So that's it. Today, our outdoor temp is 21 degrees. We keep our house at no more than 68 during the day. I'm wearing a silky (poly I guess, though I wish it was silk) cami underneath and am completely warm and comfortable. The first make of 2017 is a success. I have the next wool top cut out in this fabric and ready to sew so hopefully I'll be back next week with that one.
Friday, August 19, 2016
Middle Age, Minimalism, and Decision Fatigue
My brain has been overwhelmed for some years now. Being in my later 40's brings all sorts of life challenges. There's age and tiredness to start with. There's the challenges of raising teenagers which is enough in itself, but throw in a 5 year old too and you'll see just how rare it is to please all of them at once. There's my and my husband's aging parents and his brother with brain cancer (appointment next week to see if it has spread to the right hemisphere so prayers please). Kindergarten, high school, swimming all the time, what the heck to make for dinner, yada yada yada....
The best way I've come up with to make things more manageable in my life (besides coffee, prayer, and more sleep) is to reduce the amount of decisions that need to be made throughout the day. I've got certain routines as far as what housework is done on what days and what dinners are made. I've simplified my "beauty" routine by washing my hair only twice a week and quitting make-up altogether. I've decluttered the house except for Elena's gosh darn toys that are still everywhere, not that it was ever all that cluttered but it helps my inner peace to see the outer spaces neat.
The capsule wardrobe I've been playing with for the past year has narrowed down even more and is getting more and more minimalistic. I've reduced the number of colors and prints because I find that solids and neutrals are more soothing and chill. I'm using a comfortable to me but possibly boring to others range of black, gray, cream, teal, and blushy pinks/corals. Everything fits easily into my narrow 1950's closet with space to spare. I'm keeping the clothes' shapes simple too.
I do sometimes still crave something new though so this simple tee is the result of a last minute sew before leaving for a weekend swimming meet for Andrew last month. I had leftovers of this rayon spandex knit from the Imagine Gnats shop. (Gone now but here are some similar fabrics.) There was just enough to make a Maria Denmark Kimono tee (free pattern) as long as I didn't hem it. That's how close it was. It's drapey, easy going, and neutral while having a fun on-trend print. It goes with many things in my wardrobe so it's useful too.
It really doesn't get any easier. This style of shirt is such a basic wardrobe builder that you will find a hundred uses for. I wore this outfit all day around home and running errands and now I'm wearing it out tonight to a local brewery. I hope you have a great weekend and find some time to do something nice for yourself.
The best way I've come up with to make things more manageable in my life (besides coffee, prayer, and more sleep) is to reduce the amount of decisions that need to be made throughout the day. I've got certain routines as far as what housework is done on what days and what dinners are made. I've simplified my "beauty" routine by washing my hair only twice a week and quitting make-up altogether. I've decluttered the house except for Elena's gosh darn toys that are still everywhere, not that it was ever all that cluttered but it helps my inner peace to see the outer spaces neat.
The capsule wardrobe I've been playing with for the past year has narrowed down even more and is getting more and more minimalistic. I've reduced the number of colors and prints because I find that solids and neutrals are more soothing and chill. I'm using a comfortable to me but possibly boring to others range of black, gray, cream, teal, and blushy pinks/corals. Everything fits easily into my narrow 1950's closet with space to spare. I'm keeping the clothes' shapes simple too.
I do sometimes still crave something new though so this simple tee is the result of a last minute sew before leaving for a weekend swimming meet for Andrew last month. I had leftovers of this rayon spandex knit from the Imagine Gnats shop. (Gone now but here are some similar fabrics.) There was just enough to make a Maria Denmark Kimono tee (free pattern) as long as I didn't hem it. That's how close it was. It's drapey, easy going, and neutral while having a fun on-trend print. It goes with many things in my wardrobe so it's useful too.
For anyone new to sewing or maybe new to sewing knits, a tee like this is the easiest thing you can do. There are only 2 pieces, that's 4 seams and some hems. The armhole and neckline and just turned and topstitched with a double needle. It's a 20 minute sew and approximately $6-$7. I'm wearing it here with my knit joggers from last year and my sunhat.
It really doesn't get any easier. This style of shirt is such a basic wardrobe builder that you will find a hundred uses for. I wore this outfit all day around home and running errands and now I'm wearing it out tonight to a local brewery. I hope you have a great weekend and find some time to do something nice for yourself.
Sunday, August 14, 2016
A Kimono for Me
Last summer I made myself a Kimono out of black chiffon. I don't know much about chiffon and have very little experience sewing it. I received this piece as a prize from the fabulous Alida of Alida Makes for the original Sew the Show Series last year. I used a basic Simplicity pattern 1620 (which oddly only seems to come in the larger sizes now) and modified it somewhat. I shortened the sleeves and did narrow rolled hems around all the edges. It was alright, just ok. I wore it once or twice, but it didn't feel very cool. It felt frumpy even when worn with a tank and joggers and heels.
So as crazy as this sounds, I was watching the Netflix Full House reunion series with my daughter and I noticed lots of kimonos so I guess they're still in enough. The awesome Gibbler wore one in every episode I think. I pulled my frumpy kimono out of the closet and gave it an update.
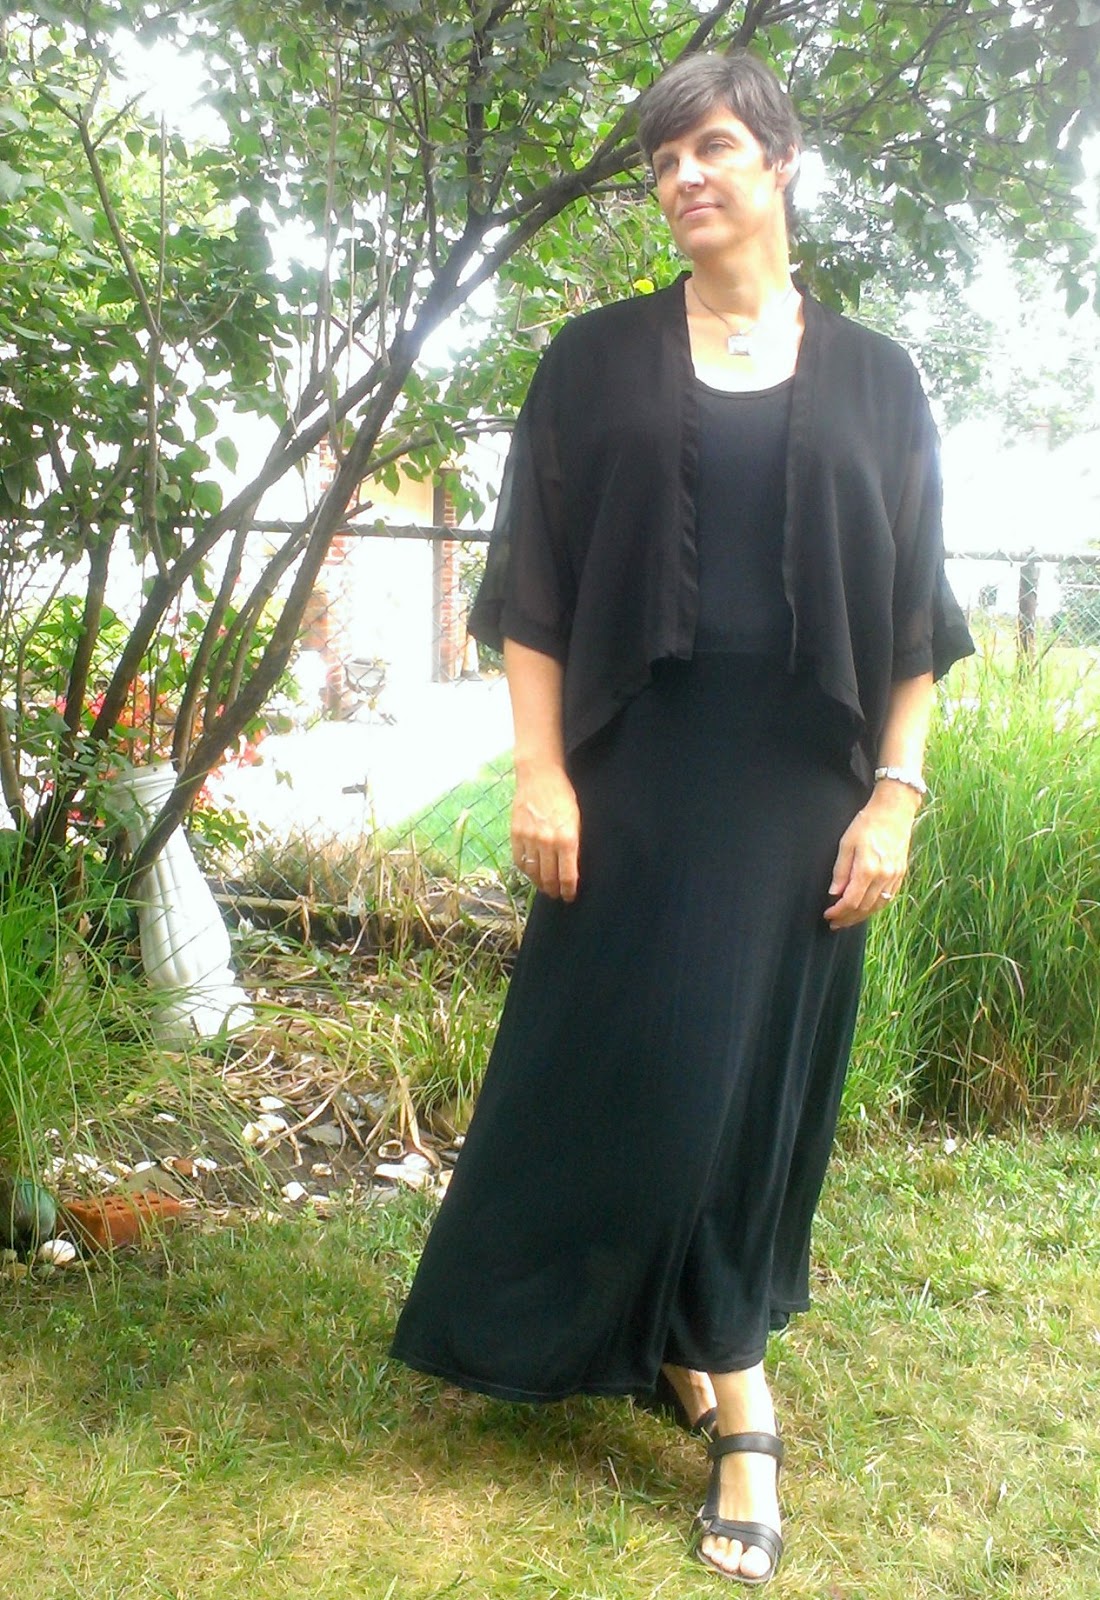
I trimmed off all the hems and then cut the front shorter and at an angle. Then I cut strips of chiffon, folded them in half and sewed them around all the edges. I used my regular machine and mock-overlocked the seam allowance and pressed it towards the body of the kimono. I topstitched with a decorative stitch all around. I also shortened the sleeves even more.
How chic? About this chic:
And this chic.
Ha, ha! I'm all posed out and feeling completely silly so that's it. I'm going to go walk around my nephew's birthday party now and try to act normal, but I really feel amazing in this outfit so I think I'll try to keep the attitude. Enjoy the rest of your weekend everyone!
So as crazy as this sounds, I was watching the Netflix Full House reunion series with my daughter and I noticed lots of kimonos so I guess they're still in enough. The awesome Gibbler wore one in every episode I think. I pulled my frumpy kimono out of the closet and gave it an update.
I trimmed off all the hems and then cut the front shorter and at an angle. Then I cut strips of chiffon, folded them in half and sewed them around all the edges. I used my regular machine and mock-overlocked the seam allowance and pressed it towards the body of the kimono. I topstitched with a decorative stitch all around. I also shortened the sleeves even more.
I left the back long and flowy and with it's original narrow hem. The back seam and the shoulder seams are all french seams. The underarm/side seam is stitched and overlocked. With a sheer chiffon, the inside finishes were important.
I wore it to church today with my Downton Abbey Lady Skater dress and felt very chic with my salt and pepper hair and silver jewelry.
How chic? About this chic:
And this chic.
Sunday, July 17, 2016
Simplicity 4237 & 1616 Mash-Up Skirt
Jersey maxi skirts have become a staple in most of our closets. They are easy to make and easy to wear. Dress them up, dress them down, but how do you keep them interesting and how do you keep from tripping on them?
I've used Simplicity 4237 (out of print but available secondhand) multiple times to make skirts of different lengths so using it again was a no-brainer. I did my usual change to the waistband piece by halving it's height and inserting 2" elastic instead of doing the fold-down yoga band. It feels sturdier for my mom-belly this way. The other big change was to use the bottom hi-low shape of Simplicity 1616 view B and to shorten the whole thing to a long midi/short maxi. This way I don't have to hitch up my skirt to run up and down the steps all day. I think this is brilliant because I still get all the swish of a maxi skirt but the higher front feels so practical.
Since S4237 isn't easy to come by, you could just use S1616 but cut the front and back pieces in half adding seam allowance. I haven't compared the actual pattern pieces, but I might next time I need to make a skirt. For now, sorry, too much trouble to locate the specific pieces in the envelope and open tissue pattern pieces and fold them back up neatly. Do you forgive me for being so lazy?
Did you notice the handstitching of all of the vertical seams? I sewed up the 4 seams and then before hemming or adding the waistband, I used pearl cotton to handstitch x's across the seams to spice it up a little. The goal was to add a little texture while remaining monochromatic and neutral. That's my best suggestion for anyone interested in capsule wardrobing. It really didn't even take all that long.
I've used Simplicity 4237 (out of print but available secondhand) multiple times to make skirts of different lengths so using it again was a no-brainer. I did my usual change to the waistband piece by halving it's height and inserting 2" elastic instead of doing the fold-down yoga band. It feels sturdier for my mom-belly this way. The other big change was to use the bottom hi-low shape of Simplicity 1616 view B and to shorten the whole thing to a long midi/short maxi. This way I don't have to hitch up my skirt to run up and down the steps all day. I think this is brilliant because I still get all the swish of a maxi skirt but the higher front feels so practical.
Since S4237 isn't easy to come by, you could just use S1616 but cut the front and back pieces in half adding seam allowance. I haven't compared the actual pattern pieces, but I might next time I need to make a skirt. For now, sorry, too much trouble to locate the specific pieces in the envelope and open tissue pattern pieces and fold them back up neatly. Do you forgive me for being so lazy?
This fabric is a medium weight rayon (blend?) jersey from CaliFabrics (but they don't have it anymore). It has held up really well. I've been wearing this once a week since late May and it still looks new. Yes, I'm super behind on blogging. My last post was weeks, almost months, ago. Sorry about that, but summer is NUTS around here. I think it is for most of us so I'm sure you understand.
Did you notice the handstitching of all of the vertical seams? I sewed up the 4 seams and then before hemming or adding the waistband, I used pearl cotton to handstitch x's across the seams to spice it up a little. The goal was to add a little texture while remaining monochromatic and neutral. That's my best suggestion for anyone interested in capsule wardrobing. It really didn't even take all that long.
The inspiration for this stitching came from this pin.
That's it folks. That's my favorite new skirt I've been meaning to show you for weeks. Summer and blogging just don't mix. I'd like to welcome all my new followers. Thanks for joining me here. I have more to post, just need to find the time to do it.
Wednesday, June 1, 2016
Experiments on a Tank Top
Sewing should be fun, right? While I am capable of sewing things like buttondown shirts and fitted pants with zip flies, those aren't my favorite kind of sewing. I really prefer the loose, improvisational makes. The ones that grow organically, just like my garden. I just had an A-ha moment. My gardening philosophy is so similar to my sewing philosophy, which shouldn't be too surprising really. Of course our thoughts and beliefs shape our behaviors, it's just funny when you notice it. My garden is definitely informal. It's definitely always changing. My favorite things to grow are flowers that are native and hardy and vegetables that are more expensive to buy organically grown. When I sew I focus on making things in better, more sustainable fabrics when possible (or upcycled) and on casual, practical pieces. Huh.
The point of this post is to inspire you to let loose with your sewing. If you're a beginner and think you have to follow the rules, I say no. Well, some rules are important, especially when working with knits, but you can have a lot of freedom too. You don't have to follow the pattern. You make the rules.
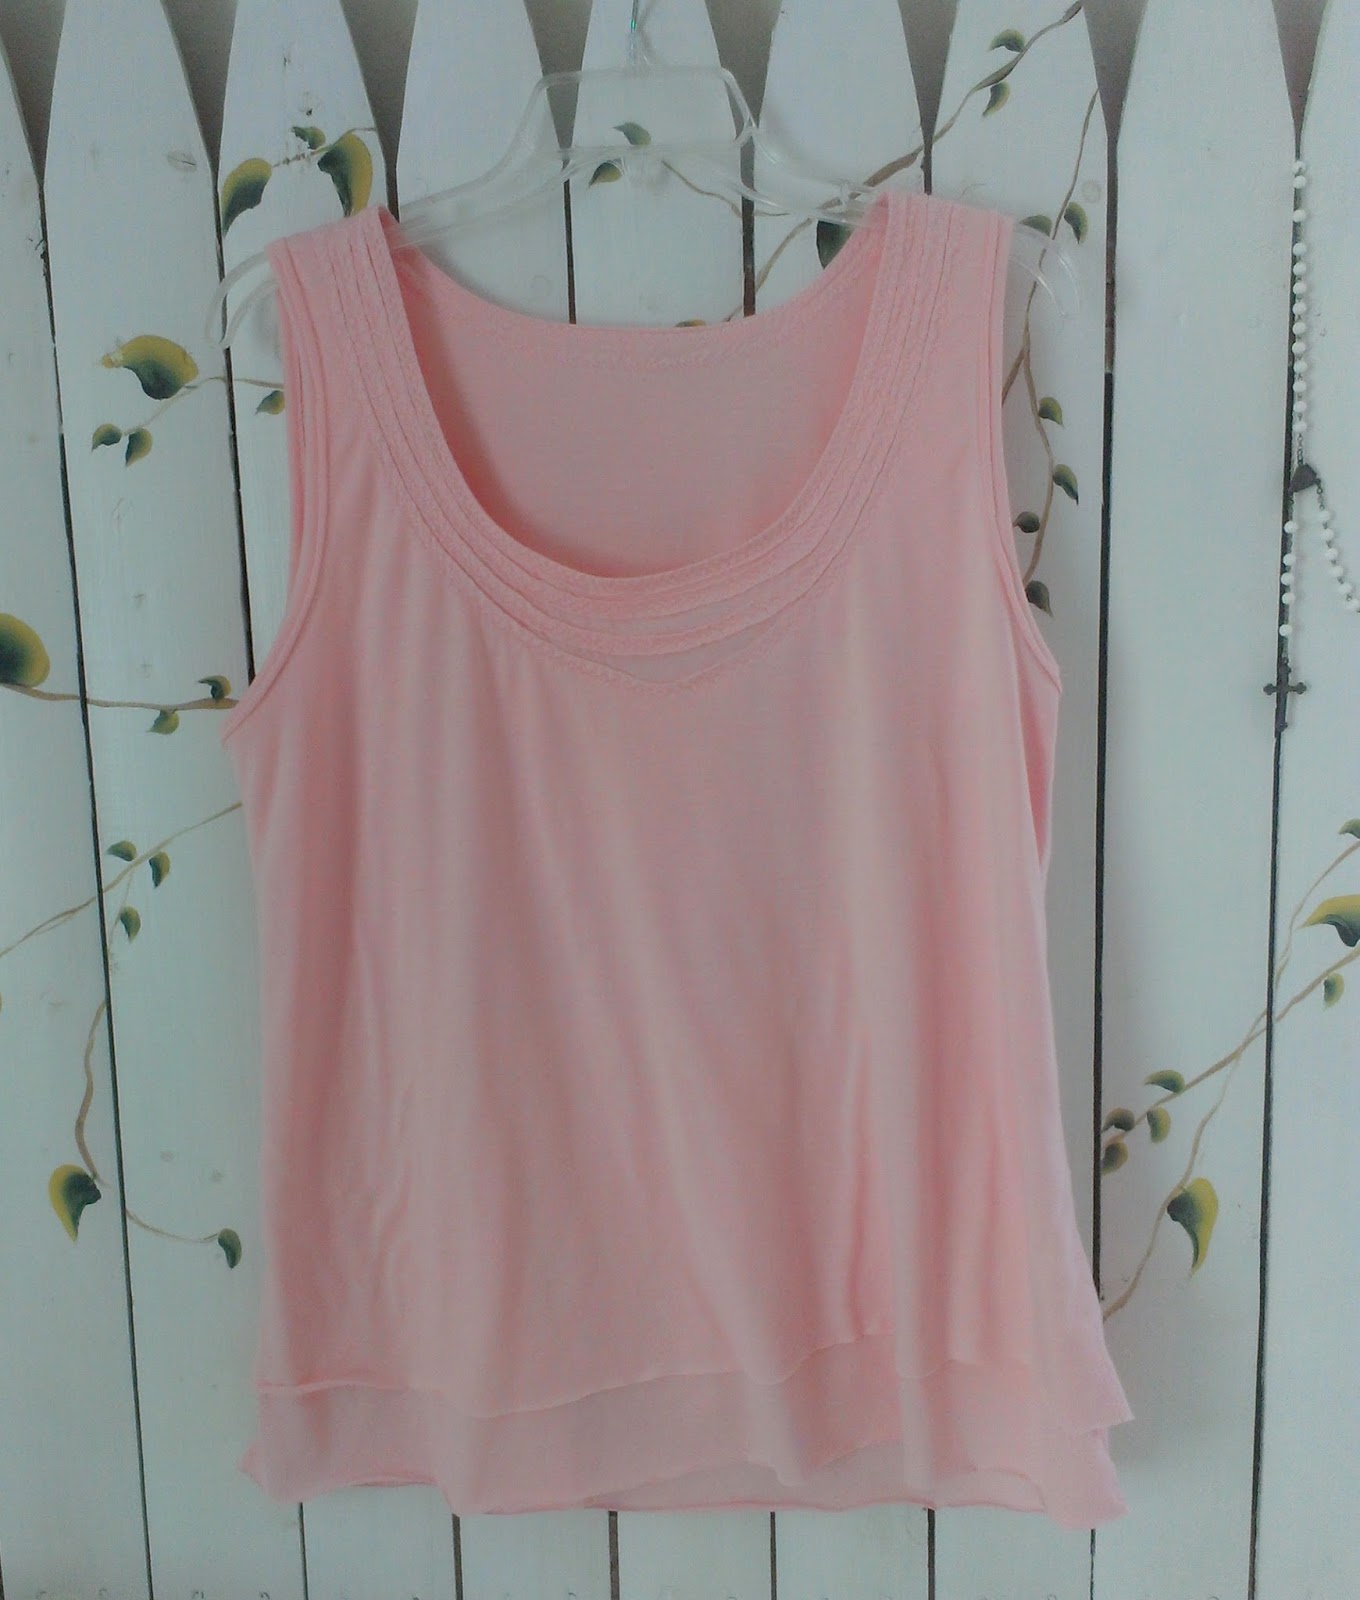
This tank began with some pink jersey from CaliFabrics. I didn't love this fabric. I used it for a cute top for Elena and loved it for her, but for me, I wasn't sure about the color so I figured I'd try it and no big loss if I didn't like it in the end. I think it is called light coral, but it's more pink than orange. It's on the thin side too so I did 2 layers which gave me some cool options. I wanted a tank so I started with the Deer & Doe Plaintain Tee minus the sleeves. I narrowed the armscye by 1/2". I sewed the shoulder seams and then put the outer and lining pieces right sides together and sewed around the neck opening. Then I used the burrito method to finish the armscyes nice and neat. (More on that later.)
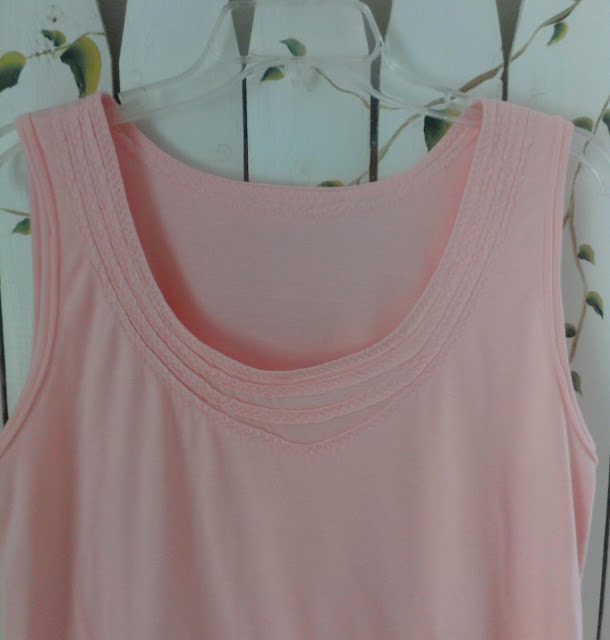
Time to embellish. So many choices. I mulled it over and decided to pick one of the decorative stitches on my machine and do multiple rows around the neck. There are 2 rows that go all the way around and 2 more only on the front from shoulder seam to shoulder seam. The plan was to make them each drop a bit in the center, like a necklace. Only I probably could have been more precise and measured and marked lines, but I didn't so you can see it's a bit off. Whatever, just having fun here. We'll see how much people stare at my boobs I guess.
It was seriously looking like granny jammies at this point so I trimmed away the fabric of the outer layer around the stitches to give a quasi-Alabama Chanin feel. That's a big stretch, but that was the inspiration anyway. Then I felt like the shoulder straps were too wide, so I carefully (this time) marked where I wanted to narrow them and trimmed them a good inch at the top tapering to nothing at the arm curve. I have to back up a second. Before I did that I trimmed 2 inches off the bottom outer layer to mimic the layers of the top portion.
That trimming came in very handy because I used it to make bindings for the armholes. Clever, huh? This is why I like to sew in silence. I know some people watch Netflix or listen to podcasts, but I prefer silence or quiet music. It's the only way I can keep focused and get in a creative space where ideas come. Of course that isn't necessary when I'm just following a pattern like I sometimes do. But even then, I might miss out on an opportunity to add a detail or change something little.
The bindings are really my favorite part. I copied something I had seen on a ready to wear dress before. I sewed the bindings into a loop and pinned them to the inside of the shirt and sewed them on. I trimmed the seam allowance a little and folded it around to the front and sewed it down 1/4" from the edge, leaving the edge free to curl. Nice detail, and easy. It aso makes not hemming the bottom make sense too. Win-win.
I don't have any real modeled shots, but I do I have one mirror selfie so you can see how it fits. A little bit flowy because of the Plaintain flare, and rather light and pretty in the end. The straps could still be even narrower, but it's good.
I hope I've inspired you to let loose and have some fun with your sewing. Be creative and do something different now and then so you have something uniquely you.
The point of this post is to inspire you to let loose with your sewing. If you're a beginner and think you have to follow the rules, I say no. Well, some rules are important, especially when working with knits, but you can have a lot of freedom too. You don't have to follow the pattern. You make the rules.
This tank began with some pink jersey from CaliFabrics. I didn't love this fabric. I used it for a cute top for Elena and loved it for her, but for me, I wasn't sure about the color so I figured I'd try it and no big loss if I didn't like it in the end. I think it is called light coral, but it's more pink than orange. It's on the thin side too so I did 2 layers which gave me some cool options. I wanted a tank so I started with the Deer & Doe Plaintain Tee minus the sleeves. I narrowed the armscye by 1/2". I sewed the shoulder seams and then put the outer and lining pieces right sides together and sewed around the neck opening. Then I used the burrito method to finish the armscyes nice and neat. (More on that later.)
Time to embellish. So many choices. I mulled it over and decided to pick one of the decorative stitches on my machine and do multiple rows around the neck. There are 2 rows that go all the way around and 2 more only on the front from shoulder seam to shoulder seam. The plan was to make them each drop a bit in the center, like a necklace. Only I probably could have been more precise and measured and marked lines, but I didn't so you can see it's a bit off. Whatever, just having fun here. We'll see how much people stare at my boobs I guess.
That trimming came in very handy because I used it to make bindings for the armholes. Clever, huh? This is why I like to sew in silence. I know some people watch Netflix or listen to podcasts, but I prefer silence or quiet music. It's the only way I can keep focused and get in a creative space where ideas come. Of course that isn't necessary when I'm just following a pattern like I sometimes do. But even then, I might miss out on an opportunity to add a detail or change something little.
The bindings are really my favorite part. I copied something I had seen on a ready to wear dress before. I sewed the bindings into a loop and pinned them to the inside of the shirt and sewed them on. I trimmed the seam allowance a little and folded it around to the front and sewed it down 1/4" from the edge, leaving the edge free to curl. Nice detail, and easy. It aso makes not hemming the bottom make sense too. Win-win.
I don't have any real modeled shots, but I do I have one mirror selfie so you can see how it fits. A little bit flowy because of the Plaintain flare, and rather light and pretty in the end. The straps could still be even narrower, but it's good.
I hope I've inspired you to let loose and have some fun with your sewing. Be creative and do something different now and then so you have something uniquely you.
Friday, May 13, 2016
Greenstyle Taylor Shorts & Modified Liesl & Co. Gallery Tunic
I finally took some more bad pictures of myself and thought I'd share them to the whole world or at least the 120 people who read this blog. I question my blogging every single time I do this. Why the heck do I do this anyway? I hope that it is helpful to see an ordinary person like myself make clothes. That is the whole point. Making is such a worthwhile activity so I hope that my awkward attempts may inspire someone else to attempt something too.
So here we go. Ugh.
I used the Liesl & Co. gallery tunic pattern to make a summery blouse. The changes are minor - I shortened the sleeves and shortened the overall length. I did a full bust adjustment and then narrowed the sides about an inch at the bottom tapered to nothing at the darts. It just felt too wide otherwise. I really love the look of it. It's sort of camp shirt meets Japanese sewing pattern. Is camping much of a thing in Japan?
Springtime photo shoots might be harder than winter because there aren't so many leaves on the trees yet so finding shade isn't always easy. I know these outdoor pics are a bit bright and I'm a little squinty but it is what it is folks.
The back of the shirt has a nice pleat. This is the most comfortable woven blouse I have ever owned. The fit and the design of it seem made for me. Nothing pulls, rubs or feels tight anywhere. It doesn't shift around and need to be pulled back into place - ever. This fabric is AMAZING. It is a double gauze from CaliFabrics (even cheaper now I see) and is light as air. It's practically like being naked because it just floats and feels so good. This fabric is double sided with a magenta and black opposite side. I ordered 2 yards not being sure what I was going to make with it exactly, but it accidentally got left off my first shipment. A quick email, a super quick response from customer service and within days I had the 2 yards plus an extra 1 for the trouble. How nice of them. So I have about 2 more yards and can't decide what to make with it.
Are you ready to see my doughy, white legs in shorts? Here we go.
I've made the Greenstyle Taylor shorts before so I didn't question which pattern to use when I needed more shorts for this summer. It's a really great pattern - easy to sew, well drafted, curved waistband, nice zip fly with a video tutorial on the website - what more do you need? Plus it's so much faster to reuse a pattern that you already have printed, taped, traced and fitted before. I briefly considered adding welt pockets to the back, but decided in the end that I wouldn't really use them anyway and since I rarely wear things tucked in no one would even see them. One of these days I will make welt pockets just because.
For my body, the only adjustments I make to this pattern are to taper the waist in a little more. From the top of the pocket upward I draw a tapered curve taking out a 1/4" from both front and back pieces at the sides and a scant 1/2" at center back. I therefore also changed my waistband piece slightly by folding out a bit in the center and taking 1/4" off each side.
My fabric here is Montauk twill in charcoal from the Imagine Gnats shop (which is temporarily closed while Rachel recovers from surgery). It is very nice stuff too. A sturdy bottomweight perfect for shorts. The pocket linings are leftover scraps of the gray tencil cotton chambray from my Granville buttondown. Nice and lightweight. My hips are definitely a size bigger than my waist so that's why the previous mentioned adjustments are necessary, but just to make sure there would be no waistband gaping, I tried something new and added some elastic to the back waist. So after attaching the main waistband piece and then attaching the waistband facing to that, I measured the back from side seam to side seam. I cut a piece of 1-1/2" elastic 1/2" shorter than that so that I could have some seam allowance and wind up with my elastic being 1" shorter than the fabric. I then laid the elastic on the main waistband piece and pinned to the side seams witha 1/4" overhang and stitched in the ditch from the top to hide it. I continued sewing as normal and it adds just a little stretch back there without looking like an elastic waist.
I'm about 8 pounds heavy right now while I'm coming off winter so these are a little tight in the hips. You can see the smile lines at the crotch. But they are still comfy and will be great within the next month when I get to my summer weight. At least I hope so because we have a beach vacation coming up in June so I better put down the chocolate and get serious.
And here's the blouse with jeans. A good look too and how I started off this day before I realized I could blog both at the same time. Yay me for making my mix and match capsule wardrobe work out so well. I am super happy with how it's coming together in time for the good weather. This has been the easiest Me Made May yet for me, though you'll have to take my word for it because I haven't documented it at all. The pressure of documenting took the fun out of it for me in the past so I decided to just not this year. I liken it to the good feeling you have when you do something nice for someone but you don't tell anyone. It's like an anonymous gift or something. Only I know it and it makes me happy and doesn't really need any attention.
Up next on the blog should be a couple of dresses made for Elena and her little friend. That should be a fun photoshoot I hope. The plan is to have that for you next week so in the meantime I wish you all a great weekend full of fun times with family and friends and hopefully a little faith in there too. I know that for me the best days all include a little Work, a little Pray and a little Sew.
So here we go. Ugh.
I used the Liesl & Co. gallery tunic pattern to make a summery blouse. The changes are minor - I shortened the sleeves and shortened the overall length. I did a full bust adjustment and then narrowed the sides about an inch at the bottom tapered to nothing at the darts. It just felt too wide otherwise. I really love the look of it. It's sort of camp shirt meets Japanese sewing pattern. Is camping much of a thing in Japan?
Springtime photo shoots might be harder than winter because there aren't so many leaves on the trees yet so finding shade isn't always easy. I know these outdoor pics are a bit bright and I'm a little squinty but it is what it is folks.
The back of the shirt has a nice pleat. This is the most comfortable woven blouse I have ever owned. The fit and the design of it seem made for me. Nothing pulls, rubs or feels tight anywhere. It doesn't shift around and need to be pulled back into place - ever. This fabric is AMAZING. It is a double gauze from CaliFabrics (even cheaper now I see) and is light as air. It's practically like being naked because it just floats and feels so good. This fabric is double sided with a magenta and black opposite side. I ordered 2 yards not being sure what I was going to make with it exactly, but it accidentally got left off my first shipment. A quick email, a super quick response from customer service and within days I had the 2 yards plus an extra 1 for the trouble. How nice of them. So I have about 2 more yards and can't decide what to make with it.
Are you ready to see my doughy, white legs in shorts? Here we go.
I've made the Greenstyle Taylor shorts before so I didn't question which pattern to use when I needed more shorts for this summer. It's a really great pattern - easy to sew, well drafted, curved waistband, nice zip fly with a video tutorial on the website - what more do you need? Plus it's so much faster to reuse a pattern that you already have printed, taped, traced and fitted before. I briefly considered adding welt pockets to the back, but decided in the end that I wouldn't really use them anyway and since I rarely wear things tucked in no one would even see them. One of these days I will make welt pockets just because.
For my body, the only adjustments I make to this pattern are to taper the waist in a little more. From the top of the pocket upward I draw a tapered curve taking out a 1/4" from both front and back pieces at the sides and a scant 1/2" at center back. I therefore also changed my waistband piece slightly by folding out a bit in the center and taking 1/4" off each side.
My fabric here is Montauk twill in charcoal from the Imagine Gnats shop (which is temporarily closed while Rachel recovers from surgery). It is very nice stuff too. A sturdy bottomweight perfect for shorts. The pocket linings are leftover scraps of the gray tencil cotton chambray from my Granville buttondown. Nice and lightweight. My hips are definitely a size bigger than my waist so that's why the previous mentioned adjustments are necessary, but just to make sure there would be no waistband gaping, I tried something new and added some elastic to the back waist. So after attaching the main waistband piece and then attaching the waistband facing to that, I measured the back from side seam to side seam. I cut a piece of 1-1/2" elastic 1/2" shorter than that so that I could have some seam allowance and wind up with my elastic being 1" shorter than the fabric. I then laid the elastic on the main waistband piece and pinned to the side seams witha 1/4" overhang and stitched in the ditch from the top to hide it. I continued sewing as normal and it adds just a little stretch back there without looking like an elastic waist.
I'm about 8 pounds heavy right now while I'm coming off winter so these are a little tight in the hips. You can see the smile lines at the crotch. But they are still comfy and will be great within the next month when I get to my summer weight. At least I hope so because we have a beach vacation coming up in June so I better put down the chocolate and get serious.
And here's the blouse with jeans. A good look too and how I started off this day before I realized I could blog both at the same time. Yay me for making my mix and match capsule wardrobe work out so well. I am super happy with how it's coming together in time for the good weather. This has been the easiest Me Made May yet for me, though you'll have to take my word for it because I haven't documented it at all. The pressure of documenting took the fun out of it for me in the past so I decided to just not this year. I liken it to the good feeling you have when you do something nice for someone but you don't tell anyone. It's like an anonymous gift or something. Only I know it and it makes me happy and doesn't really need any attention.
Tuesday, April 19, 2016
Sew Straight & Gather Legends Dress Review
I wanted a new dress for Easter, but I wanted it to be a dress I would want to wear a lot so knit fabric would be a bonus, but I wanted it to be more than a t-shirt dress. The recent Legends dress by Sew Straight & Gather fit the bill perfectly.
What a beauty, right? You can make a dress or a top with all different sleeve options including sleeveless. This is not something I could dare try to hack myself so I happily bought the pattern, actually the bundle so Elena will be getting one soon too. I love the dropped waist dress version for kids. So for being a knit dress, this pattern brings elegance, comfort, class, and fun sewing.
Fun sewing? The clean finishes inside and that collar/neckline make this a fun sew. There is a video tutorial in case you need extra help, but the instructions are really very good. I loved everything about making this dress. I did make a crazy ugly muslin out of scraps of fabric. It was soooo ugly, but it served it's purpose in testing size and techniques. I think that the cotton lycra (the recommended fabric) I muslin-ed with was lighter weight with maybe a little less lycra content than my dress version. Not by much, but as a result, the dress is a little tighter across the shoulders/bust than I intended, but I think it's a pretty good fit (and I'm always hopeful I'll lose those 10 pounds).
I was worried that the gathered skirt wouldn't be flattering, but I like it. It hits high enough (at true waist) that it highlights the narrowest part and floats out over the not great parts below. I am 47 years old and getting so tired of holding in my stomach, but I will not give up the fight, I will not go quietly into the night... (anyone else excited for the Independence Day sequel?)
Back to the dress, I think I would add in seam pockets to the skirt next time. They aren't included, but would be a very practical addition. I look forward to a long sleeved top version for fall. And since the front of the bodice is 2 layers, I'm thinking that is the perfect canvas for some reverse applique. There was nothing bad about this pattern at all. I love it. Totally worth the money.
Have you tried this pattern yet? I'd love to see your version if so. Leave a link in the comments. Thanks for reading and have a great week!
Subscribe to:
Posts (Atom)