Wednesday, November 12, 2014

Art Smocks

Elena's preschool teacher noticed that all (well nearly all) of her clothes are handmade and asked me if I sew. She was looking to have someone make some art and water play smocks. And since I can, and since I have to do service hours anyway, I wanted to help. The teacher had a good idea of what she wanted and described it pretty well but didn't have a photo to show me. I looked through Pinterest to get some more ideas, read a few tutorials, and merged a few ideas to come up with this smock.

workpraysew.com

For materials I used leftover scraps of Babyville PUL that I bought at Joann's to make waterproof training pants more than a year ago. I only made 4 pairs so there was a lot left in 3 different prints. I also used a plain men's large t-shirt. I love when I can use stash only to make a project and it costs me ZERO dollars and uses up stuff that had no other purpose.

You can see that the front is bib shaped but the back is only half as long. There are straps connecting the front and back under the arms. I thought that might make it harder for the kids to do independently but the teacher said it was good because they would get more practice at dressing themselves. All that Montessori practical life stuff that is so good.

workpraysew.com

workpraysew.com

And then because this was a lot of pink, I made another more boyish one. Again, I was working with what I had and trying not to worry about gender too much because 3 year olds don't worry about that much yet. So the front is an outer layer of PUL with another old t-shirt to line it and for the back.

workpraysew.com
Cleveland Browns colors!
I don't have photos of the process (because I work in my dark, scary basement and don't want to run upstairs every 3 minutes to photograph each step) but I can tell you how I did it.

First, I used a basic cap sleeved t-shirt pattern as a base. I went with Imagine Gnats Tumble Tee but there are other options you may already own. I cut off the bottom of the armscye to blend it into a sloping line down the side. I rounded the corners on the front piece as well. I cut one each from the t-shirt and the PUL. 

Second, I used the same pattern piece for the back but shortened it to fall halfway down the back. I cut one of those from the t-shirt using the original hem at the bottom and cutting it about 3/8" wider so I could hem the long sides.

I also trimmed the neck band off the t-shirt and set that aside.

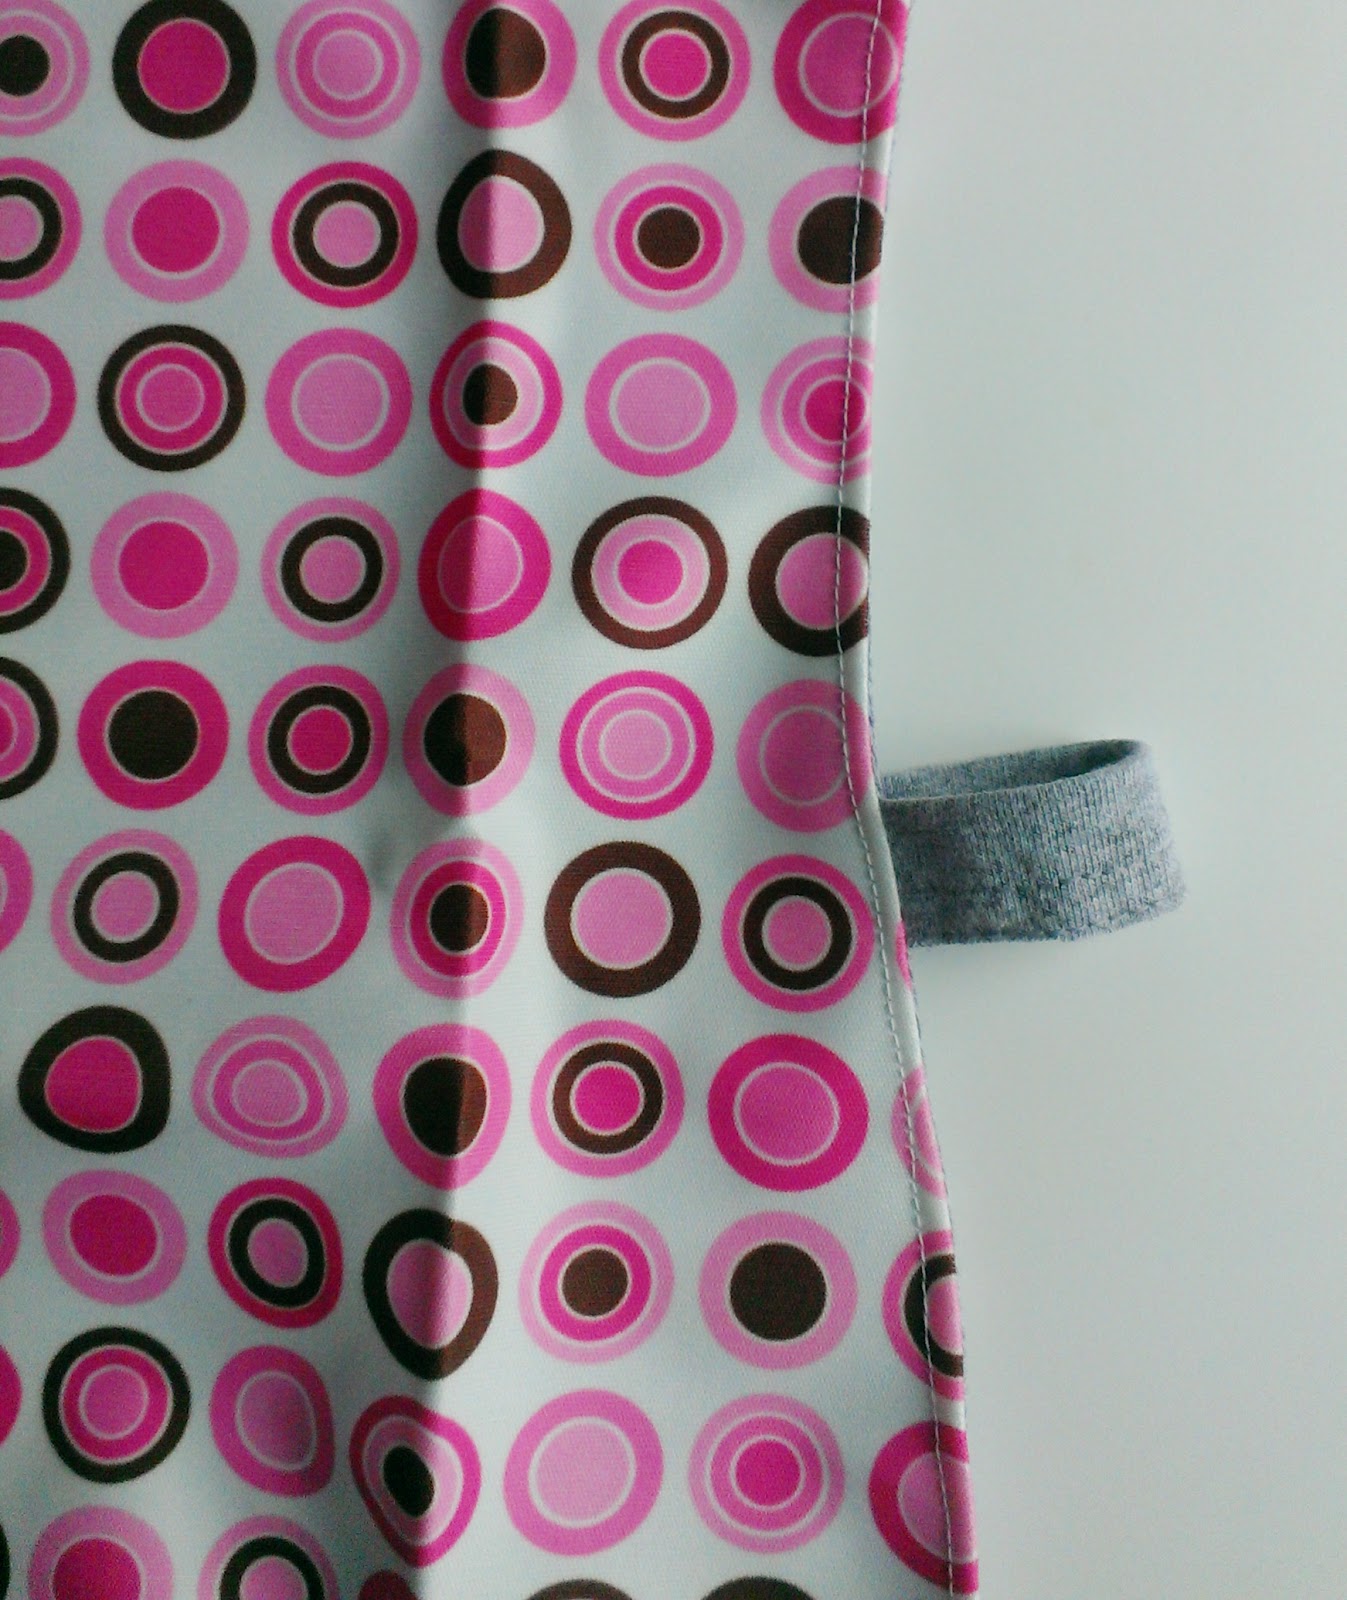
I trimmed two 4" pieces of the bottom hem off the t-shirt to use for the side straps. I made sure not to cut into the hem's stitching so it wouldn't unravel.

Start with the 2 front pieces and place them right sides together. If you use pins you should place them only within the seam allowance so you put as few holes into your PUL as possible. Sandwich your strap pieces between the layers about 8" down from the top making sure that the right side will be showing when turned over. Sew all the way down one side, around the bottom and back up the other side. Trim your seam allowance and turn right side out. You will want to topstitch all the way around now. Use your fingers to roll the t-shirt lining to the back as you go. 

Now take your back piece and press under 3/8" on each side. Stitch in place.

Attach the front to the back at the shoulder seams. Finger press the seam allowance toward the back and topstitch in place. Then carefully trim any excess seam allowance off. 

Check to see if your neck opening is big enough because the PUL on the front will render the front stretchless. I cut my neck opening just a little bigger, tried it on Elena, and then trimmed a little more in case some of the kids at school have extra large noggins. Measure that opening and then multiply by 80%. Add 1/2" for seam allowance. Take your salvaged neck band and cut it down to the measurement. Open it up to sew the short ends to form a circle. Fold it back in to hide your seam allowance. Divide your neckband and t-shirt into quarters and pin together. You may want to baste the 2 front layers together first to make things easier. Stretch your neckband evenly between the pins and sew with a stretch stitch. Trim the seam allowance. I did not topstitch.

The last thing to do is attach the side straps to the back piece  to match the front and you are done. I used a zig zag stitch and went over it few times. Easy as pie. Please just ask if you have any questions. I hope I explained it clearly enough. 

Monday, November 10, 2014

How To Make a Free New Baby Gift

My son has been swimming with the same coach for 5 or 6 years now. We've known him since he was a single guy through his getting married and now having his first baby, a girl. I definitely wanted to give them a gift but funds are super tight right now so I turned to my fabric stash and the internet and found a solution.

workpraysew.com

This outfit is for when you've had enough with the pink. These 3 knits are all from Girl Charlee at some point in the past year or two. It's amazing how small 0-3 month clothes are and how little fabric they take up. I pulled this out of my really scrappy bin where I thought they would get used as pockets and little embellishments at best. Who knew you could make a whole outfit out of nothing.

So to break it down, the dress is made using Sew Much Ado's free Infant Peasant Dress pattern. I had to lengthen the sleeves since it's winter-like here already. So while I was out shopping the other day I measured the sleeves on a couple of things in the baby department and went with 8".  This is a nice simple pattern for a beginner. Because there is no difference in the front from back I decided to embellish with a floral applique and some embroidery to define the front.


The leggings are from a pattern I already owned but had never used. It is the Titchy Threads Fancy Pants Leggings that I got as part of a Sew Fab Bundle previously. I chose this pattern because I like the idea of a no elastic waistband for a tiny baby plus it provided another opportunity to bring in a patterned fabric on the rear. They turned out really great and so tiny and adorable.

workpraysew.com

The knot hat is something I just love. I used a lot of these with all of my own bald babies, especially the two born in the winter months. The pattern is from Zaaberry and is free. There are even a couple of different kinds to make but I went with the knot. Oh the cuteness! Plus it ties the 2 prints together to complete the outfit.

workpraysew.com

I wish I had a baby around to try it on. No, not really come to think of it. Having my last baby at 42 was enough - there will be no more babies here. So I will cross my fingers that the sizing is accurate and that it fits baby Lindsey sometime in the next couple of months. I'm not too worried because I trust all 3 of those designers and have used other patterns by most of them so it should all be good. I feel like I put together a nice handmade outfit and am so happy that it cost me nothing but my time and energy and gave me something fun and creative to do.

Here's one more look at the complete outfit:

workpraysew.com


Many blessings to the coach, his wife and baby, Lindsey!!!

Thursday, November 6, 2014

Merida Princess Dress

It makes me really happy that Elena loves Merida from Brave. Merida is such a spunky character and a nice strong princess in a world of princesses who too often are waiting to be rescued. Elena has been asking for a Merida dress for months so I finally made something.

workpraysew.com

I wanted to stay somewhat neutral so it could be more multi-purpose so I went to Joann's and bought some navy blue panne stretch velvet. I think that's what they call it. I call it crushed velvet. I used Craftiness is not Optional's trusty Nessie top pattern lengthened to a dress. The Nessie already has a swingy shape so I just continued the same angle down to the length I wanted.  I also went with long sleeves and flared them out from the elbow down to be just a little bit bell-shaped.

I made separate "cuffs" like Merida has at the elbows with some cream cotton lycra and more of the crushed velvet. Again, going for versatility. The wig is from Target to complete the Merida look.

workpraysew.com

Elena has been living in this dress. The girl who formerly didn't wear clothes in the house or to bed, now lives in this thing in it's stripped down plain version. Notice in the picture below that she was watching Brave, again. This was the first try-on so it isn't hemmed yet on the bottom or sleeves. She wouldn't take it off to do that until later that night, and only with tears. Aww.


I had more crushed velvet in my stash so I made a second one. I made this one about 2 inches shorter because the original is a tad scary with her running up and down the 3 levels of this house. She still prefers the blue, but wears the red when the blue is in the wash. She evens wears them to bed. Soft, cozy nightgowns.

workpraysew.com

How's that for versatility? She can be any princess/queen she can imagine or Merida. We also bought Merida's bow and (suction cup) arrows with a quiver. She did wear this for Halloween but 15 minutes before Trick or Treating started she said she wanted to be Sophia the First. I said it's too late to change your mind now. She said she would pretend to be Sophia. So every door we went to that someone said something like, "Oh you're that girl from Brave. What's her name?" Elena said, "I'm Sophia." Whatever. I got tired of explaining the mind of the 3 year old.

Tuesday, November 4, 2014

Ansley Dress & Top Pattern Tour

Displaying AnsleyTourBanner 1.jpg

I'm very excited to participate in my first pattern tour and show you my Ansley Dress, a new pattern from Blaverry. This pattern has so many options. You can make a dress or top with a regular, ruffle or high-low hem. There are 6 sleeve options and 3 collar options! You can print just your size or follow the chart to print only the variations you choose- which collar, which sleeve, etc. Use the discount code ILOVEBLAVVERY10 to get 10% off through this Friday and get started making some sweet holiday outfits.

I decided to make a dress for Elena and went with the cuffed 3/4 sleeves and pointed collar.

workpraysew.com


workpraysew.com

I had no trouble printing only the parts I needed. I love the layered size option but can never take advantage of that because I'm almost always combining sizes. This was a 2T with 3T length. I kind of wish I had trusted the chart and gone with the 18 month for width. I just have a mental block against that for my 3 year old. I was worried that it would be difficult to get on, but it  wouldn't have been a problem because there is a placket opening at the top of the skirt portion so it opens up nicely and goes on easily. You can see it just below the buttons in the picture below.

workpraysew.com

That placket opening is a tricky part if you've never done one before. I had fortunately, but I think that is the main reason this pattern is rated advanced beginner/intermediate. It's a hard thing to describe in writing, but if you read her instructions and follow the picture, which is good at showing right side vs. wrong side, you will get it. There are plenty of photos and instructions throughout, but again, this is not for a beginner and it would be best to have some experience.

workpraysew.com

For fabric, I used this soft denim I found at the thrift store. 5 yards for $2! I added white piping to the collar and cuffs and thought it would be fun to use a back stitch to embroider some of the leaves to give it a little flare. Plus it helped pass the time at my son's swimming meet. It's quite Canadian looking, eh? Well, maybe they're more of tulip tree leaves than maples? Any botanists out there?

As for pictures with Elena wearing it, they aren't great. This girl just never stops moving. I have 60 pictures of the back of this dress and some slightly blurry ones of the front. It is adorable on her and we plan on wearing this a lot this fall/winter. And since the pattern goes from size 9 months up to 14, I'm sure this is one I'll use many more times. There are so many ways to change it up and go from classic little girl like mine to stylish teen.

workpraysew.com

workpraysew.com


workpraysew.com

workpraysew.com

I promise she likes it much, much more than that last picture would have you think. And even though I was given this pattern, I like it very much too and all opinions expressed here are my own. Be sure to check out all of the other Ansley's on the tour. It's so cool to see how many different ways this can be made.


November 6th

November 7th