Wednesday, June 28, 2017

Adventures of Gnomes in the Woods

I ordered this gnome fabric a year or two ago because Elena loved it so much. It sat around here for so long because I couldn't decide what to make with it. Elena is going through a no dresses, no skirts, no blouses phase. At least I hope it's a phase because it is truly sad for me. We went with shorts and a top to match in the end.


The top is a refashion of a jersey t-shirt into a simple peasant top. The pattern comes from the book "Little Girls, Big Style" by Mary Abreu. Elena was disappointed that it had no embellishments, but I felt like anything I did would take away from the print on the shorts or feel costume-ish. I also made a white woven cotton peasant top with smocking instead of elastic and made it cropped, but she doesn't seem comfortable in it at all. Here's a pic anyway. This pic cost me an extra ice cream cone on top of our previously negotiated fingernail polishing for the photo shoot. I love that book though and think it's a great way for beginners to have fun sewing for girls.


On to the shorts though. The Peek-a-Boo Pattern Shop Classic Chinos is a great pattern. I've used it to make her school uniform pants so I knew I'd like it as shorts. These have a zip fly with a snap, slash pockets on the front, welt pockets on the back, and an elastic back waistband. This fabric is Stenzo poplin and is the perfect weight for summer shorts. Mabel Madison doesn't seem to have this particular print anymore, but like I said, this was purchased some years ago.


We went for a hike at our favorite spot. It's a magical place with rocks, caves, and scenic lookouts to Lake Erie. It is always quite the adventure. Elena tackles the rough terrain head on even though neither of us had on appropriate footwear today.


I am linking up to Project Run & Play's June theme of Adventures and we are sneaking in just under the deadline. One last picture and that's all folks.


Monday, June 19, 2017

An Embroidered Bag & A New Clutch


Olivia and I have been collaborating on a new bag for her for some months now. She designed it entirely herself and drew a pattern. She went so far as to create the bag out of newspaper first to see if it was the right size. We headed to Joann Fabrics with some idea of what we needed and came out with this gorgeous sage colored brocade velvet and some purple cotton to line it with.

Then she set to work embellishing it with embroidery. She has a great organic work method when it comes to art. I enjoyed watching the work evolve as she chose one color after another and played around with stitch variations. The more work she put into it, the more scared I became of ruining it when it came time to sew it all together.


She wound up sewing most of the lining with only a little help from me. That way she could put pockets exactly how she thought would be best. In the end, she has only one regret. She wishes the main interior pocket was placed lower. Lesson learned. The water bottle holder on the side was a great addition. She also learned a couple of new sewing skills making that part - basting and gathering the bottom and making the elastic casing at the top. We are building confidence. I think she will want to make some clothes soon.


She didn't want a flap like her old messenger bag, or a full zipper, but she did want some kind of minimal closure so we rummaged through the bins in the basement and found this metal thing and sewed it into the top edge with some blue twill tape. It does the job and is easy to unhook one handed when needed. The handle is wider at the bottom edges to bring a little more closure to the top by rounding out the sides a bit. Turning that thick strap right side out was a 2 person job!! The strap is long enough to wear cross body, but not so long she can't throw it over one shoulder. It also works well riding a bicycle, which she is having to do a lot of this summer since 2 kids and I are now sharing my car.


Anyway, I am so happy that it turned out well and mostly that she is pleased with it too. It is quite a piece of art and I just love that she understands and likes the concept of slow sewing, of taking your time and making something you really love.

I needed a new little bag too. I made a clutch using this tutorial and some linen scraps for the outside and quilting cotton for the inside. It is the perfect size for running little errands and I can even ride my bicycle with it on my wrist too. Yes, I take turns with the bicycle too when needed.


There isn't much originality happening in this bag, but it serves its purpose and is lovely to look at. I did add some extra rows of stitching to the strap, but that's it. It's a solid addition to my summer wardrobe. Also new to my wardrobe, is reading glasses. Ugh. Getting old sucks.


Monday, April 24, 2017

A Lark Dress for Me

I am fully into planning and now sewing up my spring/summer capsule wardrobe. Navy is my dark neutral of choice for summer because it feels more summery than my beloved black and charcoal grays. As part of my minimalist, mix and match, capsuling efforts I try to limit myself to 2 or 3 dresses. I feel like I get more use out of separates, but I do love dresses, especially for Sundays.


I treated myself to a new pattern - the Grainline Studios Lark Tee. It's been out for a couple of years I think, but I'm slow to new things I guess. I made myself a boatneck, 3/4 length sleeve tee to try it out. I really liked it so I hacked it into a dress for this navy and white striped Girl Charlee Bolt fabric. And then, the very NEXT day, Grainline released an expansion pack for more top/dress options and cardigans. I'm extremely likely to buy the dress pack anyway just for the turtleneck and cowl neck options.

I changed up a couple of things to make my dress. First off, I cut the back as 2 pieces adding seam allowance. This allowed me to shape the back more and add a little definition. It also meant more stripe matching, but it was worth it. My best tricks for stripe matching are to use way more pins than normal, baste first, and try your walking foot if it's just not feeding right.

Center back seam

The other changes were to the neckline. I cut the front piece 1/2" higher and I made a facing to match. The instructions call for simply turning and topstitching the boatneck version. I have done that in the past, but I find that it often needs pressing to look nice after washing. I'm not famous for pressing my knitwear so I thought I'd elevate things with the facing. I used a double needle to stitch that facing down about 3/4" away. I'm really pleased with the look and the structure it gives.


When I was cutting out my main body pieces, I cut to the hip line and then slid my pattern pieces down to the length I wanted (38" I think) to continue that line straight down. It doesn't angle in at all. I figured I could adjust that later if desired, but guess what, I didn't desire it. Ready to see the finished product?


That's it. Two quick pics after church. I felt great in this dress. I felt like I sat up straighter and stood taller and felt more confident. But it's just a t-shirt really so it's got all the comfort. I could easily get caught up making so many of these in all of the versions. 

Friday, March 24, 2017

A Boho Chic Easter Dress

I knew I'd sew along to at least one of the Project Run and Play themes, but the question is, would Elena model for me? And that'll be a big fat NO. It was an almost - she had everything on and then in the 2 minutes it took me to run upstairs for different shoes, she ripped everything off and was done. I'd like to call her names, but that wouldn't be nice. So my feelings are hurt, but the good news is that the dress looks so completely adorable on her. I couldn't be happier about that part of it.

I used the Heidi & Finn Modern Color Block Dress Pattern and made only one modification - I added side seam pockets. Since I was using all one fabric, I didn't really need to cut the pieces separately but I did anyway to make it easy to add the lace in a nice straight line. I love this pattern because it is a nice simple shape, it's easy to sew, and it's fully lined. Elena loves this pattern because of the simple shape - meaning no ruffles or frills. Little girl is going tomboy on me - which is cool except for Easter. Sorry kiddo, you're wearing a dress.


The crochet lace was given to me by my mother and I have no idea how it came to her. She probably picked it off of a tablecloth or something if I know her. The fabrics were a prize I won ages ago - so long ago that I don't know how or from whom. I kept the selvege, but now I can't find it. (Such a bad blogger.) I remember that it said they were printed in Japan. I did an image search and I'm sorry to say, it can't find it anywhere.  Here's the inside, nice and clean (but a little wrinkled- oops).


I didn't put the lace on the upper back because I felt like it would be uncomfortable and would make it difficult to sew the opening which happens to be the trickiest part of this pattern by the way. I taped those 2 pattern pieces together and cut it as one piece. I chose a nice wooden button from my stash.


I thought Elena might faint at the sight of the headband I made up from some FOE and 3 store-bought flowers, but she actually likes it and put it on immediately. So maybe she will be a tomboy with floral headbands this summer. It looks especially good worn low, hippie style. 


Hopefully on Easter I'll be able to sneak a couple pictures of her in it and post them on Instagram. 


Thursday, March 2, 2017

A Girlier Lane Raglan

If you look at this picture...


...you might think I made a Lane Raglan. No big deal. Right? We've all made a bazillion Lanes by now. But there are a few things I want to show you about this particular Lane Raglan.

The first is the that I followed some advice I'd never heard before and cut my neckband on the bias. This comes from Melissa at Melly Sews and I think it turned out great. This fabric doesn't have a ton of stretch so I think it was key in getting a nice flat neckband. Check out her post here.

The second thing is the change to the sleeve.


I copied the proportions of a knit top I bought at Kohl's this winter. I cut the sleeves at 6 inches and added 6 inch bells or ruffles or whatever you want to call them, for 3/4 length sleeves overall. There is only 4" of extra width gathered in so they aren't too full.

The third thing is the stitching.


I'm still on the decorative stitching instead of double needle stitching kick. It's just so easy and adds a nice touch. This is stitch #40 on my Singer Quantum Stylus. You know how long that would take me by hand? I do enjoy hand embroidery, but this is so much quicker. Just be sure you have enough thread on both your top thread and bobbin before you start each area because running out in the middle of a line is not attractive. I used this to hem the sleeves and bottom as well and also to topstitch the neckband down.


The last thing I want to talk about is the fit. It's a bit tight in the chest. I'm sure you noticed but were too nice to say anything. So here's my excuse. This top fought me every step of the way. I started out using a completely different pattern for a draped front raglan that I've made in the past. BUT, I just didn't like how it looked in this fabric AND I accidentally attached the front piece inside out! I had serged and lightening bolt stitched so there was no chance of unpicking the whole thing. So I cut it apart and was able to re-cut the front and back pieces and cut entirely new sleeves using the Lane pattern, but the sleeves had to be shorter and I had to use the tiniest seam allowances possible.

So it is a bit snug, but I'm not worried because I gave up dairy for Lent and should be able to drop my winter weight pretty quickly while I suffer through Mexican food sans cheese and no homemade yogurt with homemade granola for breakfast, etc. My chest is one of the first places I lose weight, so that's kind of good news for this top.


What I really like about this top is that it's basically a t-shirt and suits my casual everyday style, but I feel like it can be dressed up a bit too. The fabric is a wool jersey that was nice to work with and feels good - not like wool in other words.


This top makes me feel ready for spring, but I really need some new jeans and pants in general. I think I'll wait and see how much the lower half of me loses though before I shop or sew much more for me.

Tuesday, February 21, 2017

Skip the Double Needle Hem


I made myself this sweatshirt back in November and it took me until now to get some pictures of myself in it. I wear this about once a week because it is so warm and comfy. The fabric is organic french terry from Cali Fabrics last year. They still have it in forest green if you are interested in using great organic fabric that feels good and you can feel good about using.


The pattern used here is the Sofilantjes Otium Sweater again. The only change I made was to round the bottom up at the sides a little. This is the most basic version of the pattern and I realize it's not exactly exciting, so why I am blogging this you may be wondering.


It took me a couple of years to get smart and read my sewing machine manual to learn to properly use my double needle for hemming and topstitching. Now I'm a pro at it, but I still find it annoying. I have to wind an extra bobbin and change the needle. Not that that is so awful, but there is another way. A lot of the decorative stitches on my machine are stretch stitches too. A quick snap on of a different foot and you can be in business. For this sweatshirt, I used matching thread to add subtle details at the seams and the bottom hem. It's such a quick and easy way to add a small detail to a basic without needing another machine. I was thinking of using this technique with that fun rainbow variegated thread for a top for Elena. I think she'd like that.


The snow has melted, spring is not far off. I'm really getting excited about spring/summer sewing ideas so I hope to be back soon with something fun to show you.

Thursday, January 5, 2017

Wool Jersey Otium Sweater Hack

Happy New Year! It's been a busy couple of months since I've posted, but let's just pick up where we left off. It'll feel like reconnecting with your old college friend you haven't talked to in ages. You don't need to hear what's been keeping me away, let's just be happy to be back together.

I treated myself to a few cuts of wool knits from the Imagine Gnats shop. My first make of this year is a Sofilantjes Otium Sweater hack using this wool jersey. This is my first time purchasing and using wool jersey, but it won't be my last! I think it has surprised me in a couple of ways. First off, it's soft. I was worried about buying online without feeling it, but I read a review that said it was soft, and it is. No scratchiness at all. The second surprise was that it was completely easy to sew with requiring no special anything.


The only pictures I have are selfies in the mirror. Several technological difficulties have happened around here lately and it's been pretty tough to keep up with all the changes. As it is, my laptop is hooked up to a 32" TV right now for me to even post this. I was pretty pleased with myself for figuring out that I could unhook teen boy's Xbox and plug that cord into my laptop to use the TV as a monitor. Yay me.


If you aren't familiar with the 
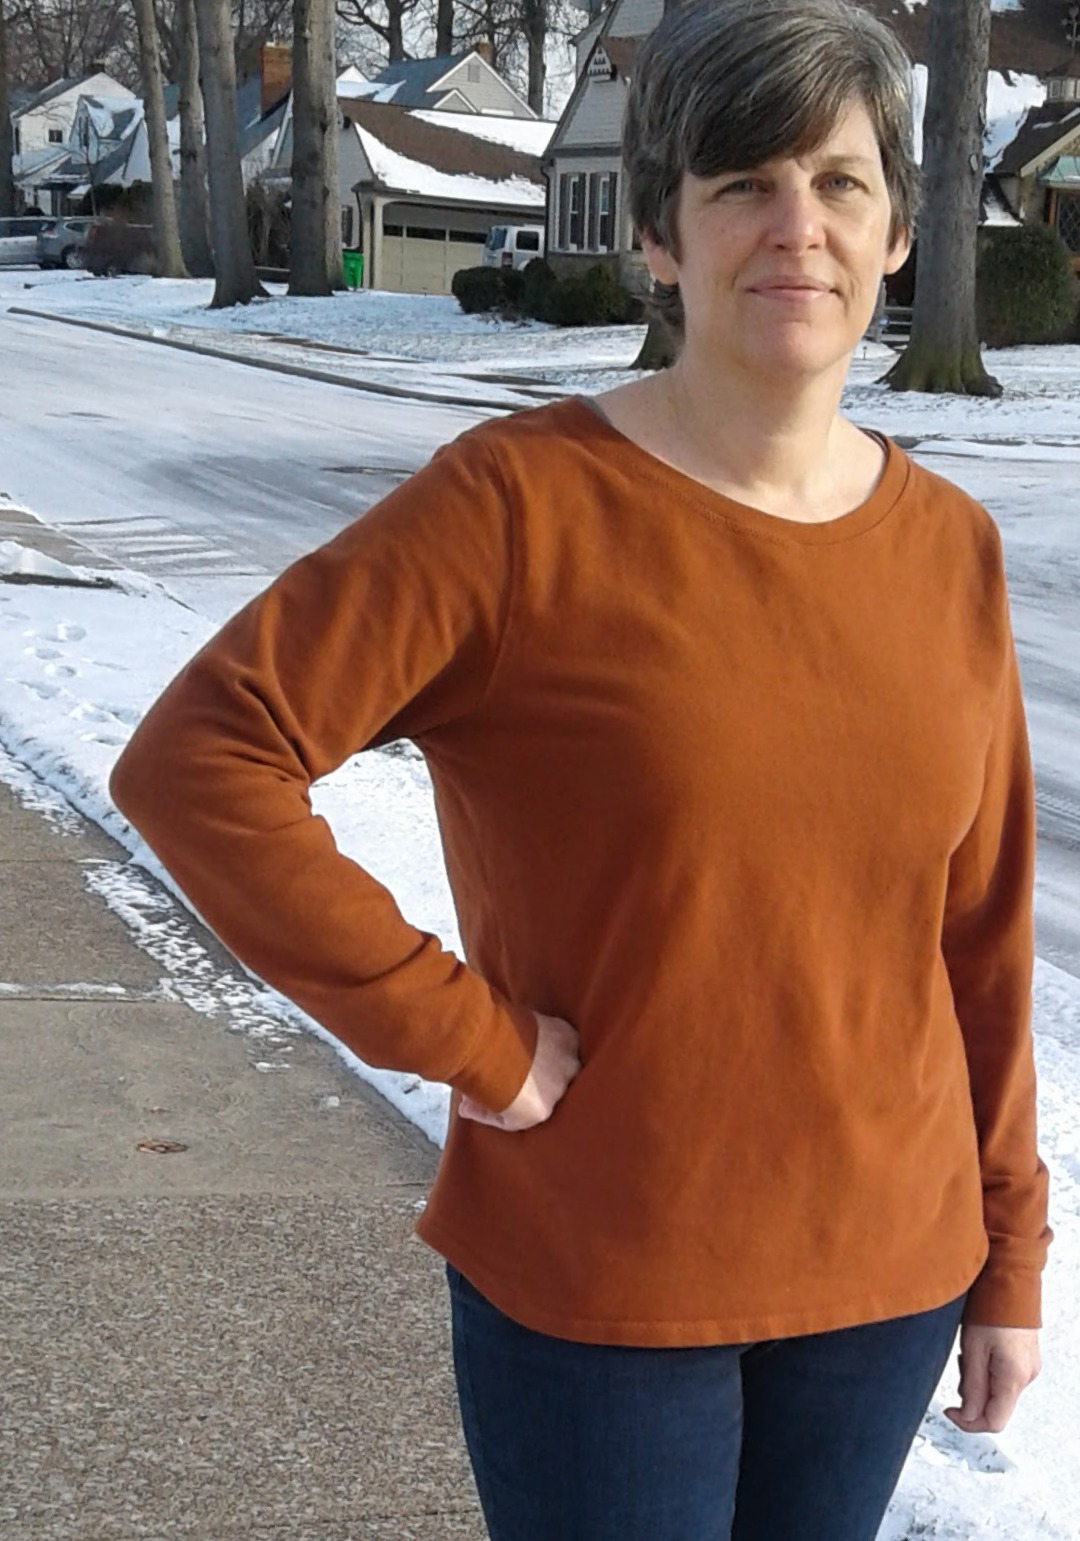
Otium Sweater pattern, I'll tell you it's a great basic that has some options to dress it up. I have the bundle pack so I've made several for all the women in the house. I did make a couple small changes of my own to this one. For starters, I cut the bodice pieces 3" shorter, but then cut a large 10" band to double up for the bottom. I did this as a design detail but also to add weight to the top so it would hang nicely.


Being familiar with the pattern, I knew that the sleeve length is nice and generous already requiring no additional length for me whereas I often have to add length to other designers patterns. I wanted a long, slouchy sleeve look though, so I cut the cuffs double the usual length. I also narrowed them some to fit my bony wrists snugly. Love how they turned out.


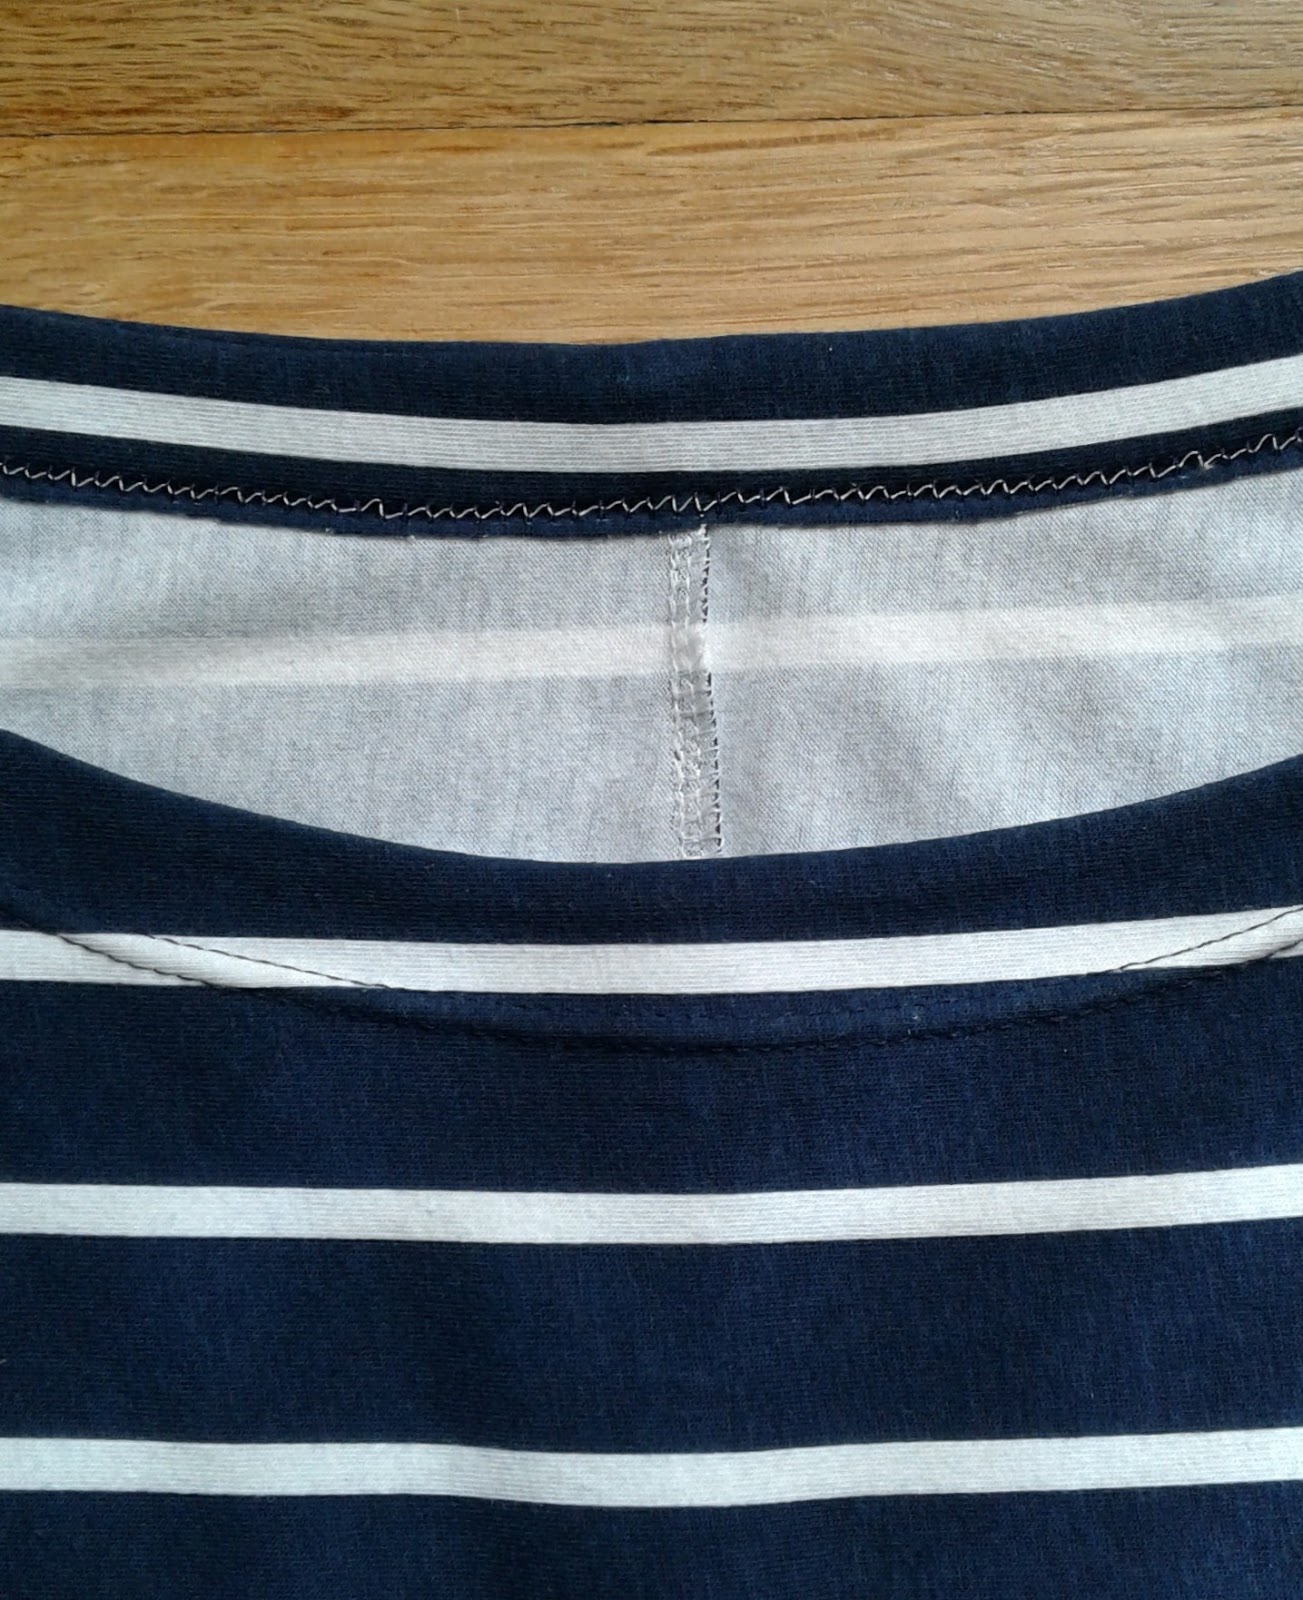
The pattern calls for finishing the neck with a band, but I simply turned and topstitched with my double needle and matching thread. The front is possibly a bit higher also. I cut it much higher but then cut some back off so I can't really say how much different it is from the pattern.

So that's it. Today, our outdoor temp is 21 degrees. We keep our house at no more than 68 during the day. I'm wearing a silky (poly I guess, though I wish it was silk) cami underneath and am completely warm and comfortable. The first make of 2017 is a success. I have the next wool top cut out in this fabric and ready to sew so hopefully I'll be back next week with that one.