Showing posts with label toddlers. Show all posts

Thursday, May 22, 2014

More Hanami Improvisational Pleats


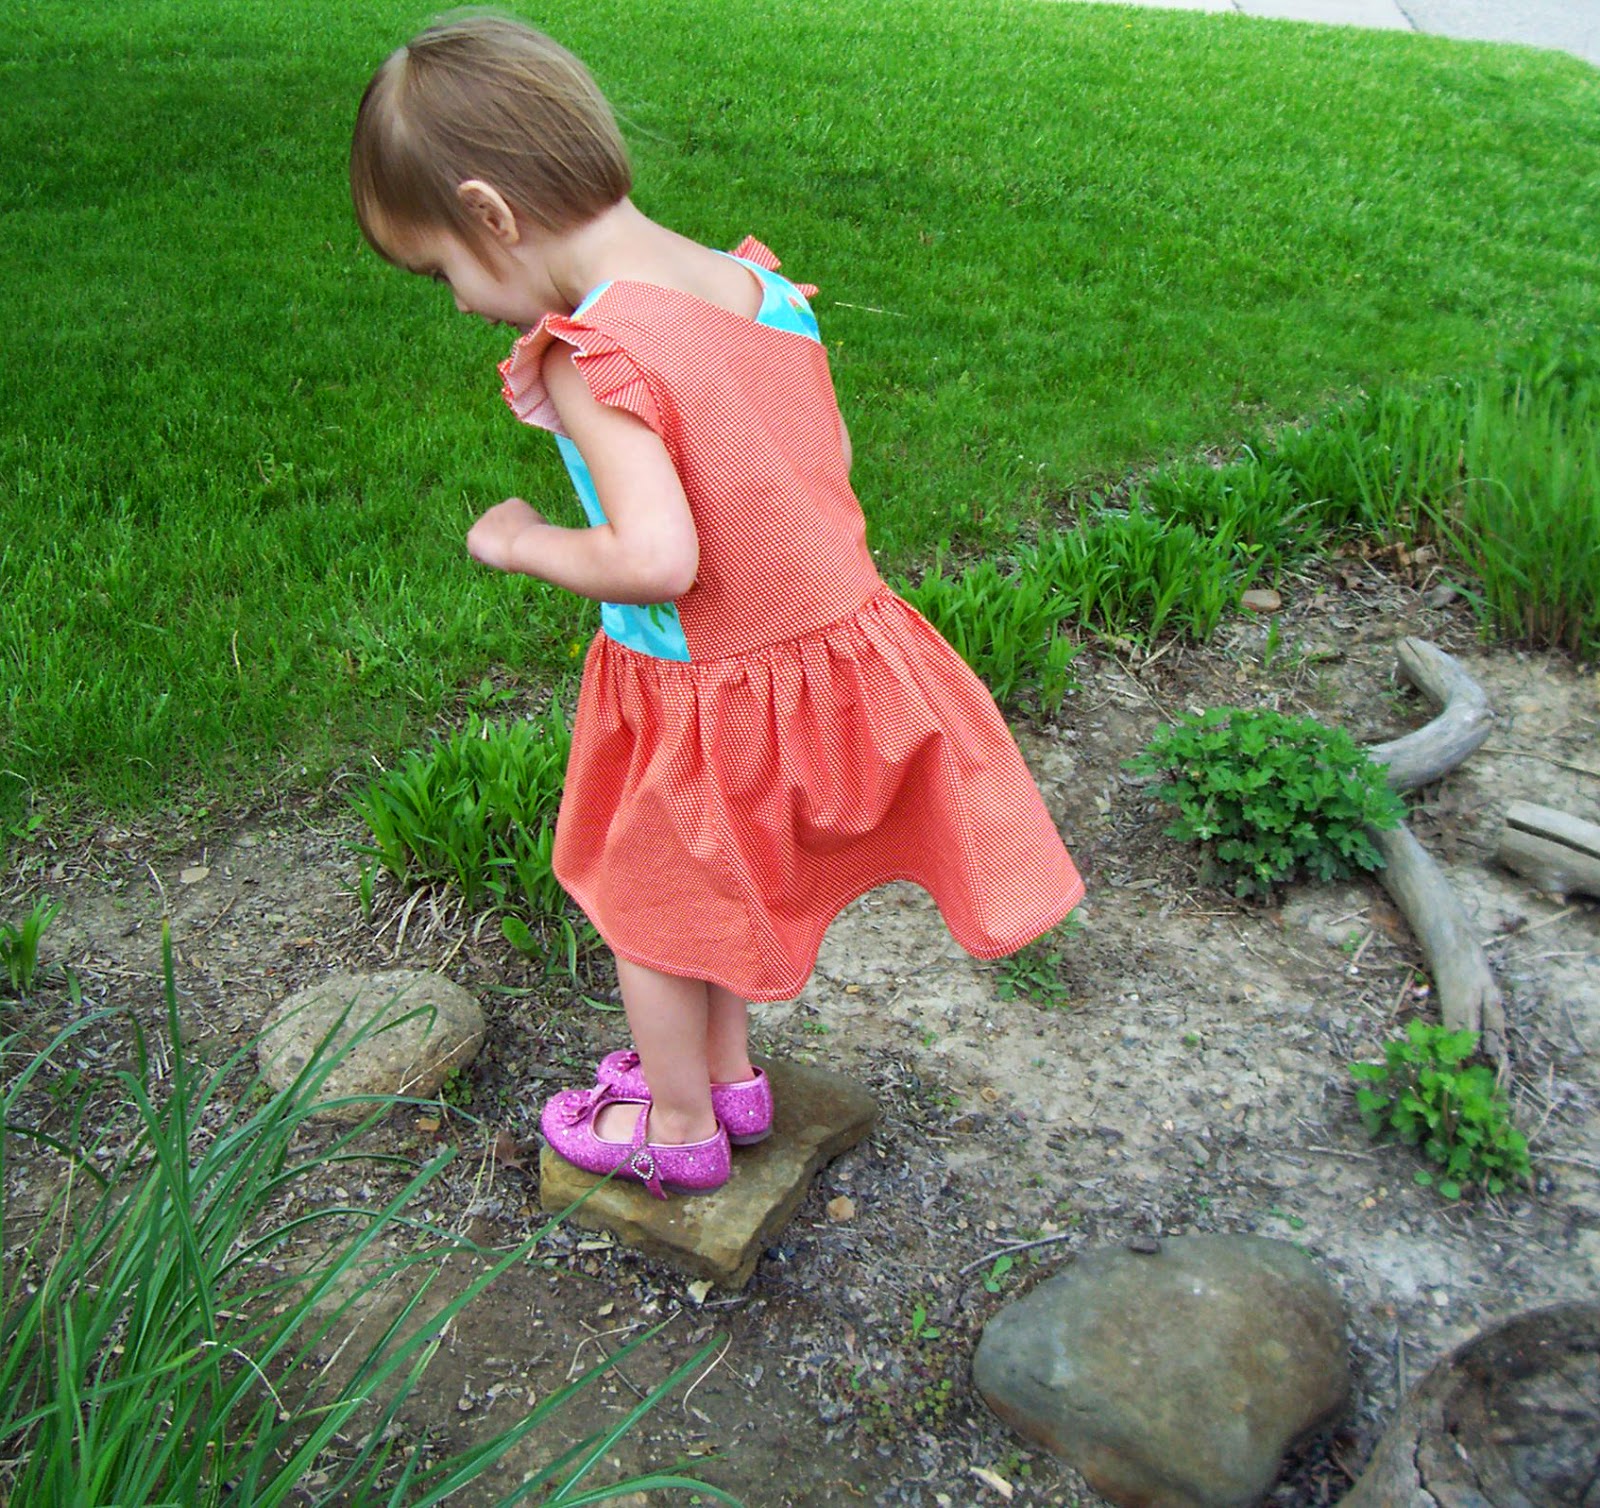
Elena now has another pleated Hanami. This time I went with the adorable crossed back and skirt length. The previous one was pretty and dainty so this time I wanted to make one that was more colorful and fun for my girl that never stops moving. (Please ignore her silly Princess shoes. Pick your battles, I always say.)


I had scraps of this novelty sea creature fabric left from a Halloween costume 12 years ago and I finally found a use for it. The orange polka dots is leftover from this recent dress and purchased at Joann’s in March. The pleated piece at the center front was made to mimic the fins on the sea horse’s back. At first it bothered me that it wasn’t symmetrical – I have a thing about symmetry. But now, I’m good with it because it’s relaxed, playful, and carefree – all qualities I could use more of. I cut the flutter sleeves, but I pleated them instead of gathering to create more fins. The lining is white with orange polka dots from my mom's stash passed on to me.


I love the peek of the seahorse fabric on the back too. In fact, I got a lot of pictures of her back because like I said, this girl never stops moving for long.


This dress suits Elena’s personality so well! The size 2 again fits her perfectly. I didn't modify one thing when cutting and that is rare for me.  This is a pattern I’ll be getting a lot of use out of for many more years to come. 

I can't resist posting one more funny picture. Elena has a serious issue with bugs all of a sudden. Here she is giving her best regards to one.


Thursday, May 1, 2014

Hanami Love - Improvisational Pleats


I have wanted the Hanami pattern since the day it came out. StraightGrain was one of the first blogs I came across a year ago when I discovered this incredible online sewing world. I was pretty sure that my little Elena would look great in any of An's patterns because she is built just like her daughter - rather slight, very feminine little body and face. I didn't buy until recently as part of the Perfect Pattern Parcel #2. This one's being in the parcel clinched the deal.

And then if I wasn't happy enough already just to get the pattern, An came out with a contest to use her improvisational pleating techniques. Oh, I love a good contest. I am way too competitive sometimes. I will be linking up later in May when the time comes. You can read all about it here.


This top is just beautiful, inside and out. I added the improvisational pleats to the bodice - no measuring or pre-planning. I hope they're irregular enough to look intentional and not just wonky. I was not drinking, I promise. I wanted the top third of the entire top to be pleated. The fabrics are things from my mom's old stash. All very lightweight cottons. I went with the zipper back (but not an invisible zip), the peplum length, the peter pan collar, and the tulip sleeves. Too much cuteness.


It might be just a little too dainty for Elena. As pretty as it is, if you know Elena, she is much more of a firecracker than this top would suggest. It is light and comfy so she isn't complaining at all, but she would probably prefer one in a brighter color. I'm thinking of some orange with tiny white polka dots I have leftover from this dress. I think I'll try the crossback and the flutter sleeves. That will be more her style.


The leggings are homemade too out of cotton lycra knit from Girl Charlee last year. I used elastic to ruche the sides a bit. They match the zipper.


Do you know what she is doing in the above picture? She is counting how many marshmallows she is going to get for these photos. Ah, the cost of doing business with a 2 year old.

Thursday, April 24, 2014

September Tunic

This has to be one of the sweetest little things I've sewn in a while. The September tunic in turquoise gingham - oh man, it doesn't get any better than that. I made another top this week too and it's lovely in a different way, a fussy way, and I'll talk about it another day. This gingham top just makes me smile. Less is more a lot of times.

2 photo shoots attempted and neither one very successful so this is all I've got. I love sewing and writing, but photographing a moody 2 year old, I could do without. Better keep sewing for myself or I'll have nothing to blog about. ;-)

The mug shots first.


Haha. Oh man, what a stinker. So we tried outside in her element, lots of distractions from the camera.


The pictures do not do this top justice, but I couldn't let the week go by without posting something.

This pattern makes a really adorable top and I can recommend it with a big smile on my face. Measure carefully and follow the sizing chart because this is a 2T and it just fits my string bean. It's a nice slim cut which works perfectly for her.

Here's hoping for better photo shoots in our future.


Monday, April 14, 2014

PRP - Signature Style (with a Z thrown in for Sew All 26)

Time to kill two birds with one stone here. I have sewn along with Katy of No Big Dill since letter H, I think, so I wanted to finish that out, even if it's not the most creative use of Z. It's a cheat  because it doesn't even begin with Z but it has two Z's in the middle - the Izzy top!

This free pattern from Climbing the Willow is adorable, and popular, so I wanted to try it. I have a top myself that is the same cut (Simplicity 1620 if you want a mommy and me look), so I already knew I'd like it. I used some ancient rayon challis leftover from the early 90's along with some super soft peach gauze. It's definitely a little bit country, but I think that's me.


My signature style would have to incorporate recycling and de-stashing. Also, something feminine, but not pink or sparkly (though Elena does like that sort of thing). As much as I like contemporary style in magazines, and I even did purchase a pretty modern sofa recently, I am traditional to the core. I like antiques, real wood, gardens full of daisies and black-eyed Susans, casual country style. I know this because once a month when my subscription to Country Living Magazine arrives, I look at the pictures and I feel like everything is right in the world. Gorgeous gardens; homegrown, home-cooked food; modern country decorating (i.e. no pine furniture with heart cut-outs or doilies); and scenes of sweet children playing in the flowers. (That's Elena in our front garden last fall and it makes me melt.)


I also made a tiered denim skirt out of thrift store denim yardage- score! The underskirt makes me laugh every time I look at it because it is made from is the top piece of my neighbor's new bathroom curtains. Lol. She asked me to shorten her new curtains by cutting off the top and making a new rod pocket. For some reason, I didn't throw away the top piece. All I had to do was sew one seam up the back, feed elastic through the old rod pocket, and gather and sew some lace trim to the bottom. That was a 10 minute job, if that!


I wanted to keep the lace separate from the denim skirt so it would be versatile, because I am really, really practical. I can't help it. There is only so much time and so much money in the world and that's my signature style too.

And now a few pictures in action, on a windy day as spring is finally starting to arrive here.


Monday, March 24, 2014

PRP- Put Me In The Zoo

Season 9 of Project Run and Play is here, and I think we're going to see some amazing clothes from these amazing contestants. Their combined creativity and sewing skills means this is going to be so inspiring. I am going to sew along for some (or maybe all) of the weeks. I made some New Year's Resolutions about not spending money on fabric for clothes that Elena doesn't need so I will try to adhere to that. But if the fabric was free to me, or the clothing is something she needs, or if I can refashion something, then game on!

Our Put Me In The Zoo look is inspired by Elena's recent discovery and love of Disney's 101 Dalamatians.


The tunic length top has a nice swingy shape and contrast button placket down the back. I combined a few different basic bodices to get the shape. The neck and armholes are finished with matching bias tape and the ruffle cap sleeves are attached following this method explained nicely last week on You and Mie. 


This fits with my resolution requirements because the rayon fabric was repurposed from a top I made myself last year but didn't like. (Not sure what I was thinking with this print.) I was even able to reuse the bias tape and make some more. The solid black was gifted to me from my mom's destashing last year, the buttons too. The capri length knit leggings were also given to us and now they are useful because we have something to wear with them. 


Make It and Love It

Wednesday, December 4, 2013

Toddler Infinity Scarf


I checked a Love of Crochet magazine out of the library, and set out to try some new things. First up, was the Winter Skies Cowl. I made this scarf for Elena, mostly because that's how much of this leftover yarn I only had. A happy accident. I only had enough to do the first 5 rounds, but it wraps around her skinny neck 3 times and looks great with her fleece jacket which was all she needed on a nice 50+  degree day in December. I love it. She looks quite stylish for a slightly ill 2 year old out for a hike at the duck pond and nature center.


Thursday, November 7, 2013

Training Pants Free Pattern

     I had some time to figure out how to scan my pattern pieces and make it accessible for you all. Remember, this is a 2T and you'll have to adjust if you need bigger or smaller. Make sure to print with no scaling. There are 3 pages total. Let me know how it goes or upload photos to my Flickr group.

Workpraysew Training Pants Free PDF Pattern in size 2T

Edit on 4/25/14:  Please refer to this post for the tutorial.


training pants by workpraysew.com

Wednesday, November 6, 2013

Totally Cute Training Pants

training pants by workpraysew.com


     The time has come. Elena is 2 years and 4 months -a good time to potty train. We have a relatively slow month before things get crazy around here again. Those teens sure keep us hopping with their sports and hobbies. So now, while we have a chance to hang at home more than usual, is our chance.

     I'm getting some resistance from her so I'm trying to keep it light and positive. The Smarties are purchased except I keep eating them and having to buy more. heehee.  I made her some totally cute training pants. The Dora and princess underpants are ready. We have multiple potties on every level of the house. And the big thing - I put her back in cloth diapers. It took only half a day before she brought me a disposable diaper and said, "Different diaper. Too gross." Sorry kiddo, your mama is hardcore.

     We practiced EC (elimination communication) from the time she was about 3 months until she hit a year and started walking. Then she totally lost interest and just wouldn't do it anymore. It became a power struggle so I let it go. But I experimented back then with making different training pants. I searched the internet and tried a couple different patterns. I tried different fabrics - old tees, micro fleece for the banding, using PUL off of leaky cloth diapers I bought off of Craig's List. Those first 5 pairs taught me a few things and now I'd like to share it with you.

     Good stretchy cotton t-shirts containing some lycra or spandex work great. The absorbent soaker can be made from either old prefold diapers or layers of flannel - old receiving blankets can be repurposed or use the scraps from making pajama pants. It just depends on how thick/absorbent you want them to be. You can add PUL to make them waterproof if you want or not.

     My pattern is a modification of a couple I found online. I drew it out and added the measurements so you can make one for yourself. This fits my 2T daughter nicely. It has room to grow. The leg bands are slightly big on my skinny mini with these dimensions so I used larger seam allownances to take an inch or so out. The waist fits comfy and lose enough for her to be able to do herself.


      I wish I could give you a printable pattern, but it's not hard to draw out on your own. Knit is so forgiving that as long as you make this approximate shape, it'll be good. I'd suggest making one complete pair before you start making them assembly line style. That way you can make any adjustments needed.

Here's how I do it:

1. Make the soaker pad. I cut 3 layers of flannel and stack them and pin them together. Overlock the edges all the way around. Or use a serger if you're blessed with one. I used this super soft monkey print in hopes that she will be inspired to not, uh, get the monkeys wet or dirty.


2. Cut the PUL. I trace each soaker just to make sure it matches.


3. Pin the soaker to your panty piece, wrong sides together. Flip it over and lay the PUL right side up over the right side of the panty and pin. Remove the pins from the other side because you'll be sewing from the top.


4. Using a wide zigzag stitch, attach all 3 layers by sewing around the edges. Use your fingertips to feel that everything is lined up. Afterward, check that you caught all the edges on both sides and go back and add more if necessary.

5. Fold the whole thing in half right sides together to sew the side seams. I use a straight stitch here.
Turn right side out. It's starting to look like a panty.

6. Now for the leg bands. Sew the short sides together, right sides together. Finger press the seam open and fold it down on itself wrong sides together to form the band. Pin the band to the right side of the leg opening. Match the seam to the side seam and stretch to fit the rest in. Sew all the way around with a zigzag stitch so it'll give.

7. The waist band works the same way and requires no elastic. Sew the short sides right sides together. Finger press the seam open and then fold it down on itself wrong sides together. Mark the band and the waist of the panty in quarters and pin the waistband to the right side of the panty. I put the seam in the center back. Sew with a zigzag stitch.

8. Go back and trim down the seams of the leg bands to reduce the amount wicking.

    The "waterproof-ness" is not 100% because the PUL layer doesn't cover the entire panty. You could make them that way, but I don't find it necessary. My goal is to reduce the amount of wetness to my furniture and also to her clothes. This way works well for me. Babyville recommends throwing the sewn products in a hot dryer for 20 minutes to shrink the holes made by the needle.

     You could also put that PUL layer between the soaker and the panty piece if you prefer. They make such cute fabrics that I wanted mine to show and then you get the bonus of having the tee do some absorbing as well.


     Elena was not in the mood for a photo shoot so this is the best I could manage for photos wearing them. It's not good at all.