Wednesday, September 21, 2016

A Tutorial on a Textured Reverse Applique Technique


I'm back as promised to explain how to do the fabric manipulation technique I used in my last post.
The top is the CINO Nessie top pattern using the colorblock option. That's right, I didn't even have to hack the pattern. It comes this way - ready to embellish! 


 Now, I didn't think this up myself to be honest. I saw this pin that doesn't really lead to a tutorial or anything, but I did want to give credit. The pinned example looks to be made of felt, but I thought it would work well with knits. I've kind of got a thing for reverse applique so this really charmed me.

This technique is pretty simple but gives big results. You will need to cut 2 pieces of that upper bodice in contrasting fabrics. Most any knit will work. These happen to be a cotton/spandex and a rayon/spandex underneath. As long as it doesn't fray, you are in business. Stack them on top of each other right sides up. You can baste around the edges if you like, but on a small piece like this, I didn't bother. (You could also cut 2 rectangles big enough for your pattern piece, do the technique, and then cut out your actual pieces from your new "fabric")


Use a ruler with a 45 degree angle to mark lines across. I used chalk and spaced mine 3/4" apart.


Sew across those lines with a straight stitch. I chose matching thread but imagine the possibilities. I used a stitch length of 2.5 as usual, but larger would be cool too.


Now mark the lines the same distance in the opposite direction and then sew them too.


Now comes the scary part. You will need to use some small scissors to cut away the 2 bottom sides of each square. Gently pull the 2 layers apart and pinch the bottom corner. Picture a vertical line running down to that point at the bottom. Make a small snip at the center bottom. If you centered it well, it will make it easy to then cut up to the corner on each side. The first few will feel scary as heck, but you will get quicker and more confident after just a few squares. I've done other reverse applique projects (you can see them here) where I completely cut away that top layer so it didn't matter how neat or perfectly placed that first snip was. With this, you are leaving the whole top layer there so you do need to be as accurate as possible with that first snip. You could always practice on a scrap first if you are really worried.


Then just sew up the pattern as usual. I waited to cut open some of the squares that were near the edges until after I sewed the rest of the shirt. I didn't open a couple at all if I thought they might stick out funny near a seam. 


So that's all there is to it. If you try it, I'd love to see your project so please post a link in the comments if you do. Be brave and have fun.


Sunday, September 18, 2016

Upcycling a Nessie Top and Hosh Pants

Welcome to my Project Run & Play sewalong look for week 2: I'm An Autumn. Fall clothes are THE best. I've always loved getting new clothes for fall and then look forward to the weather cooling off enough to wear them. I love the deep, warm colors of fall and I also tend to think of texture with fall clothes - think chunky sweater knits, corduroy, etc.

One of my favorite aspects of sewing for children is that with smaller fabric requirements, you can upcycle a lot of the time. Having her only sister 13 years older than her means that while there is a good pile of hand-me-downs for Elena, only some of them are classic enough to save as is for future years, but many wind up being remade. I like that upcycling costs me no money, but I also like the nostalgia of seeing Olivia's clothes worn by her little sister.

http://www.workpraysew.com/2016/09/upcycling-nessie-top-and-hosh-pants.html

The pants are LouBee Clothing Hosh Pants with added welt pockets on the front. They began their life as a dress from Old Navy. It's a medium to heavy weight knit with good stretch and recovery. After cutting the dress apart I noticed that the back of the dress had a center seam that I had to straighten out before I could use it. I used a straight edge and marked where to sew a new seam to straighten it. This means that one pant leg has an outer seam, but who is really going to notice that?


I fancied up the pants a bit by adding welt pockets. I made WELT POCKETS! This has been on my sewing bucket list for well over a year. I'm so glad I did it because 1.) they were the perfect pocket for a pant with no (or only 1,  heehee) side seam and 2.) I feel like a sewing genius now. After watching a couple of video tutorials, I wasn't too scared of the sewing, it was the placement. I was hacking here and totally guessing as to where to put that first one and then not so confident about making the other one match it. So stressful. But it turned out well and now I have the confidence to welt all the pockets.


The shirt is the really fun part. It is made from a long sleeved tee my mom passed off and a tiny piece of rayon/spandex knit from CaliFabrics. I used my favorite old Craftiness Is Not Optional Nessie Top. Gosh, I love that pattern. This upcycle was meant to be. Look at this pattern layout in the next picture and see how little of the shirt was wasted.


So a recycled Hosh pant and Nessie top outfit came to life. I can't tell you how much I enjoyed the process of making this one. Between pushing myself to try the welt pockets and the fear of cutting through the second layer on the bodice portion, this one was a roller coaster of emotions. The process and all the nerves were well worth it. I'll do a tutorial on how to do the textured reverse applique technique later this week. And now, more pictures.

(Edited 9/22/16: The tutorial is here.)

http://www.workpraysew.com/2016/09/upcycling-nessie-top-and-hosh-pants.html

http://www.workpraysew.com/2016/09/upcycling-nessie-top-and-hosh-pants.html


http://www.workpraysew.com/2016/09/upcycling-nessie-top-and-hosh-pants.html


Monday, September 12, 2016

Pokemon Inspiration for Project Run & Play

I absolutely love sewing along with Project Run & Play. I (pretty much) always love the themes they choose for each week and love that it gets my creativity going. I'm grateful to have the time and energy to sew again now that school is in session. It feels like there is time again to do what makes me happy. Sewing for Elena makes me happy.

This week's inspiration is Pokemon. Andrew is 16 now but Pokemon was huge for him when he was 8 or 9. It's something he had been sharing with Elena for the last couple of years - watching the shows together, looking at his old cards, and he even found the half dozen Pokemon stuffies he had stored away. So this was something they shared even before the Pokemon Go thing hit. It was so cute to see him take his little sister (11 years younger than him) out Pokemon hunting this summer.

We decided to do a loose interpretation of Butterfree since we love butterflies. Who doesn't love butterflies?
                                                Image result

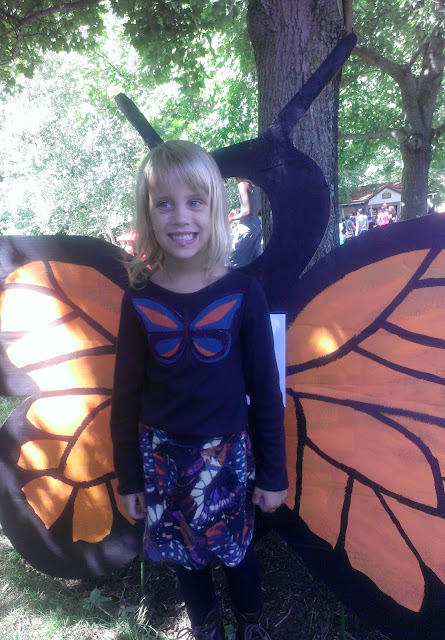
I remembered a skirt that Olivia used to have that had similar colors and in an abstract butterfly print. Perfect. You know I love refashions, but this one makes me extra happy since Olivia has been gone 2 weeks now and this is a way to keep her in our daily lives seeing her clothes on Elena. I remade the skirt into another skirt (boring, I know) and made a long sleeved tee with a butterfly applique.


There isn't much to say about the skirt. All I had to do was cut the waistband off and shorten it in width and height and serge it back onto the skirt bottom. That may have taken all of 6 minutes, but I really love it and so does she.


The t-shirt was based off the bodice portion of the Willow & Stitch Gumnut dress pattern. I like the more feminine neckline it has for a basic tee so it was worth it to make the necessary changes. I just had to extend the overall length and the sleeve length. Easy to do with just a few measurements. The fabric is black interlock that I think came from the remnant bin at Joann's. I had about a half a yard and it was plenty. The neck and sleeves are finished with self bindings instead of bands for a nicer clean finish.

http://www.workpraysew.com/2016/09/pokemon-inspiration-for-project-run-play.html

The applique was the fun part. I spent about 2 hours trying out various butterfly shapes and sizes and auditioning all the various scraps. Sometimes having so many options (hello giant scrap bin) makes things so much harder. Elena helped out a lot with this part because I really wanted to feature colors of her choosing. Then I used a washable glue stick to stick it all down before machine stitching everything with matching color threads.


A huge storm blew through Saturday leaving us with gorgeous sunny and cooler weather to attend a Bug Day event at a local park on Sunday. Of course you have to wear your new butterfly outfit to the Bug Day. The park was so crowded though that it was actually hard to find a place to take pictures without photobombers.  This fun monarch butterfly cut-out was lucky though.


Thanks for looking. We'll be back next week with our Autumn inspired look. I don't know which outfit I like better, but I'm sure having fun with these themes. Have a great week.